As organizations continue to adopt OpenShift Virtualization and modernize their production hosting environments, inevitably questions about how to manage “Gold-disk Images” of corporate approved Operating System installs come up. We have discussed the concept of Gold Images before when we talked about Installing Windows from ISO on OpenShift Virtualization, but this time we will look at consuming a VM image created outside of OpenShift to explore new OpenShift/Kubevirt topics. This post will cover the following new topics DataSources, VirtualMachineClusterPreference, and DataImportCron for making this VM image available in OpenShift Virtualization.
In this blog post we will use an OS that is not commonly seen in OpenShift Virtualization and for which there are no pre-existing templates, FreeBSD. We will also leverage “ContainerDisks” for storing our OS image, which allows us to use a Container Image registry (such as Quay.io or JFrog) to manage our versions of the OS.
Goals
We are going to cover a lot of ground in this blog post. So let’s outline our goals:
- Create a new VirtualMachineClusterPreference to support FreeBSD-14.
- Create DataCronImport objects to automate the creation of DataSources
- Launch VMs based on the imported OS image and VirtualMachineClusterPreference
- Update the source image to simulate an enterprise patching cycle
As part of this Blog post we will be talking about two key “Personas” commonly seen in Enterprise organizations. The first persona is that of the OS Engineer. The OS Engineer (and his/her team) is responsible for creating Gold Disk images that are patched and updated with the latest software required to run in their datacenter. Usually on a monthly cadence they release a new version of the Gold-disk Image and require that all future VMs deployed must be built from this latest base image. The second persona is that of the OpenShift Virtualization Admin. The OpenShift Virtualization Admin is responsible for making the monthly gold-disk images available in the OpenShift cluster(s) to deploy VMs from. The OCP-V Admin does NOT create the OS images, he/she only consumes them from the OS Engineer.
FreeBSD?
We will be using FreeBSD 14 as the target OS image for this blog post. As an OS Engineer we will create our base gold-disk image, starting with a QCOW2 image from bsd-cloud-image.org. As an OpenShift Virtualization Admin we will review how to create a VM Preference, A DataImportCron job a Container Disk for tracking changes, and how to apply proper permissions for users to see the DataSource in an OpenShift cluster. Finally ss an OS Engineer we will go through and update the image twice to simulate an external process providing us with an updated image and see how this can be automatically imported into OpenShift, for future VMS to be built from.
WARNING: We will be using FreeBSD as a part of this blog post, but the settings/options and commands that I use here are for demo purposes only. I am NOT a FreeBSD admin or expert. Use any FreeBSD settings and options in your environment at your peril.
Create Container Disk
We will start our work as an OS Engineer. We have a base QCOW2 image (or RAW image, either will work), but we need a way to make it available to our OpenShift Administrator. In order to do this, we will leverage our enterprise container Registry to store our OS images. To start we will need to create a ContainerDisk for storing our base OS image. In a nutshell, ContainerDisks are container images, with a QCOW2 or RAW file located in the “/disk” path of the container. This is the ONLY contents of the container image. Create a Dockerfile with the following contents:
FROM registry.access.redhat.com/ubi10/ubi:latest AS builder
ADD --chown=107:107 freebsd-14.2-zfs-2024-12-08.qcow2 /disk/
RUN chmod 0440 /disk/*

FROM scratch
COPY --from=builder /disk/* /disk/
NOTE: Be sure to update the file added in line 2 to match the file that you will be using for your ContainerDisk.
With your Dockerfile created, build the ContainerDisk podman build -t registry.xphyrlab.net/cloudimages/freebsd-14:latest . and push to your local registry podman push registry.xphyrlab.net/cloudimages/freebsd-14:latest. You will need to ensure that the container image can be pulled from your registry without additional authentication, or you will need to update OpenShift with additional credentials to pull from that registry.
Create Project
With our ContainerDisk uploaded to our container registry, we will now switch over to our OpenShift Virtualization Admin persona. For this blog post, we will store our corporate approved OS images in a separate project called xphyrlab-os-images, keeping them separate from the images supplied by Red Hat that are stored in openshift-os-images. We will start by creating this project oc new-project xphyrlab-os-images.
Create VirtualMachineClusterPreference
With our project/namespace created, we will continue working as the OpenShift Virtualization Admin and create a VirtualMachineClusterPreference. VirtualMachineClusterPreference are used to define options around the creation of the VM. They help you do define things like DiskBus, IOInterfaces, as well as boot options such as BIOS vs EFI, as well as minimum CPU and Memory requirements. We will create a new VirtualMachineClusterPreference specifically for FreeBSD.
apiVersion: instancetype.kubevirt.io/v1beta1
kind: VirtualMachineClusterPreference
metadata:
  annotations:
    openshift.io/display-name: FreeBSD 14
    openshift.io/documentation-url: 'https://example.com'
    openshift.io/support-url: 'https://example.com'
    iconClass: icon-freebsd
    openshift.io/provider-display-name: Xphyrlab
  labels:
    instancetype.kubevirt.io/os-type: freebsd
    instancetype.kubevirt.io/vendor: xphyr.net
  name: freebsd
spec:
  annotations:
    vm.kubevirt.io/os: freebsd
  devices:
    preferredDiskBus: virtio
    preferredInterfaceModel: virtio
    preferredRng: {}
  features:
    preferredAcpi: {}
    preferredSmm: {}
  firmware:
    preferredUseEfi: true
    preferredUseSecureBoot: false
  requirements:
    cpu:
      guest: 1
    memory:
      guest: 2Gi
NOTE: The valid names for
iconClassare listed here: https://access.redhat.com/solutions/5648261
Create a file called freebsd14-vmcp.yaml with the contents above, and then apply to the cluster with oc apply -f freebsd14-vmcp.yaml.
Create DataImportCron
Continuing our work as the OpenShift Virtualization Admin we need to create a DataImportCron object. The DataImportCron object creates the automation that watches our corporate registry for updates to a ContainerDisk and creates a DataVolume with the contents of the disk, and updates our DataSource. Create a file called freebsd14-dataimportcron.yaml and paste the following into the file:
apiVersion: cdi.kubevirt.io/v1beta1
kind: DataImportCron
metadata:
  name: freebsd14-image-cron
  namespace: xphyrlab-os-images
  labels:
    instancetype.kubevirt.io/default-preference: freebsd
spec:
  garbageCollect: Outdated
  managedDataSource: freebsd14
  importsToKeep: 2
  schedule: 07 * * * *
  retentionPolicy: None
  template:
    metadata: {}
    spec:
      source:
        registry:
          pullMethod: node
          url: 'docker://registry.xphyrlab.net/cloudimages/freebsd-14:latest'
      storage:
        resources:
          requests:
            storage: 32Gi
NOTE: setting
retentionPolicy: Nonewill delete any DataVolumes and DataSources associated with this DataImportCron instance when the DataImportCron instance is deleted.
The schedule is in “cron” format, so the above cron schedule will run every hour at 7 minutes past the hour. To learn more about the cron time format, check out Crontab.guru.
Apply the DataImportCron object to your cluster with oc apply -f freebsd14-dataimportcron.yaml. We can now check on the status of the DataImportCron object by checking the status of the DataVolume that it is creating. Use oc get datavolume -n xphyrlab-os-images to get a list of the DataVolumes in the xphyrlab-os-images project. The DataVolume will create an associated PersistentVolumeClaim so we can check on that as well with the command oc get pvc -n xphyrlab-os-images.
$ oc get datavolume -n xphyrlab-os-images
NAME                       PHASE              PROGRESS   RESTARTS   AGE
freebsd14-22aad47aaa51     ImportInProgress   94.62%                2m19s

$ oc get pvc -n xphyrlab-os-images
NAME                       STATUS   VOLUME                                     CAPACITY   ACCESS MODES   STORAGECLASS             VOLUMEATTRIBUTESCLASS   AGE
freebsd14-22aad47aaa51     Bound    pvc-6267606c-5e7b-4d01-8ed9-9a0fb5b788db   30Gi       RWX            synology-iscsi-storage   <unset>                 3m3s

$ oc get datasource -n xphyrlab-os-images -o wide
NAME                  AGE
freebsd14             24h
Label the DataSource
The other object that the DataImportCron creates is a DataSource. The DataSource is a named object used by OpenShift to identify bootable disks in a cluster. DataSources point to source PVCs that contain a bootable disk image. These DataSources can then be updated, so as new versions of the based disk image come out, the OpenShift Virtualization Admin can update the DataSource and point to the new image. So that OpenShift knows what type of OS this is, and what VirtualMachinePreference to apply to a VM that is based on this image, we need to label the DataSource with the name of the VirtualMachineClusterPreference we created earlier.
oc label datasource/freebsd14 instancetype.kubevirt.io/default-preference=freebsd -n xphyrlab-os-images
At this point we can now create a FreeBSD14 virtual machine.
Lets create a VM
OK, so I lied …. if you follow standard process to create a VM you will find that the VM does not start. It will have an error similar to this:
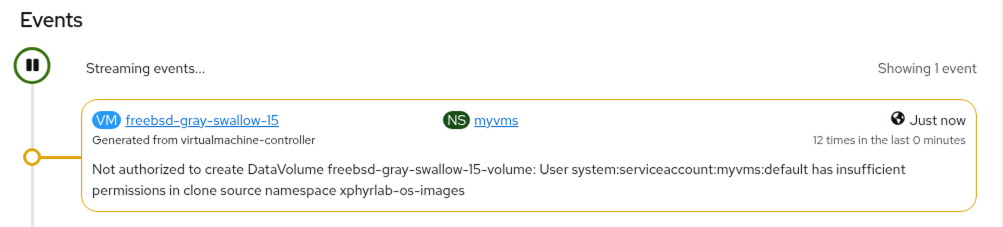
As the error states, we do not have the proper permissions to clone our DataVolume across namespaces. We will solve this issue by creating a new Role and RoleBinding, that gives access to the DataVolume(s) that we create in our xphyrlab-os-images namespace. To learn more about Roles and RoleBindings, I suggest taking a look at Using RBAC Authorization from the Kubernetes.io website.
Creating Role and RoleBinding
We will start by creating a NameSpace scoped Role that gives the minimal access to DataVolumes in our xphyrlab-os-images namespace only:
apiVersion: rbac.authorization.k8s.io/v1
kind: Role
metadata:
  name: os-images.kubevirt.io:view
  namespace: xphyrlab-os-images
rules:
- apiGroups:
  - ""
  resources:
  - persistentvolumeclaims
  - persistentvolumeclaims/status
  verbs:
  - get
  - list
  - watch
- apiGroups:
  - cdi.kubevirt.io
  resources:
  - datavolumes
  verbs:
  - get
  - list
  - watch
- apiGroups:
  - cdi.kubevirt.io
  resources:
  - datavolumes/source
  verbs:
  - create
- apiGroups:
  - cdi.kubevirt.io
  resources:
  - datasources
  verbs:
  - get
  - list
  - watch
- apiGroups:
  - cdi.kubevirt.io
  resources:
  - dataimportcrons
  verbs:
  - get
  - list
  - watch
- apiGroups:
  - ""
  resources:
  - namespaces
  verbs:
  - get
  - list
  - watch
Create a file called xphyrlab-os-images-role.yml with the above contents and then apply it to your cluster with oc apply -f xphyrlab-os-images-role.yml. With our Role defined we now need to create a RoleBinding that will associate the Role we created with the subjects (users/accounts) that have access to this role. We will give all service accounts access to the DataVolumes, as well as all users that have been authenticated the Role that we just defined.
apiVersion: rbac.authorization.k8s.io/v1
kind: RoleBinding
metadata:
name: os-images.kubevirt.io:view
namespace: xphyrlab-os-images
roleRef:
apiGroup: rbac.authorization.k8s.io
kind: Role
name: os-images.kubevirt.io:view
subjects:
- apiGroup: rbac.authorization.k8s.io
kind: Group
name: system:authenticated
- apiGroup: rbac.authorization.k8s.io
kind: Group
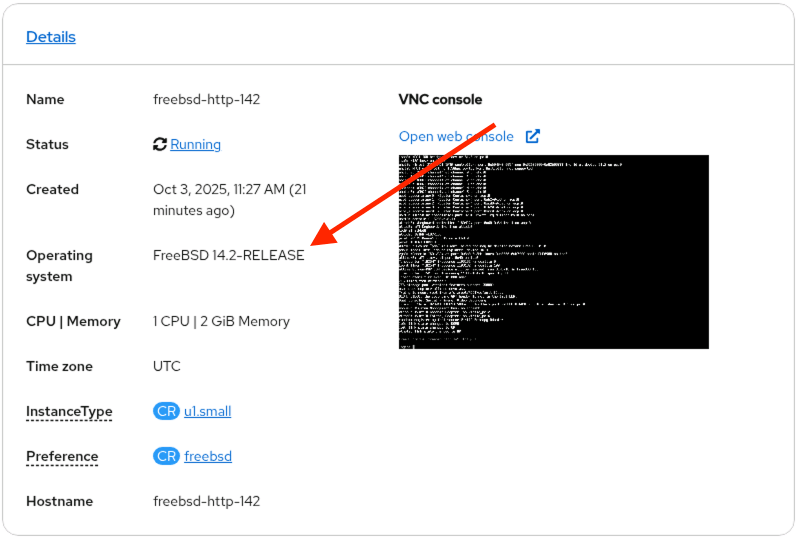
name: system:serviceaccountsCreate a file called xphyrlab-os-images-rolebinding.yml with the above contents and then apply it to your cluster with oc apply -f xphyrlab-os-images-rolebinding.yml. If you go back to the OpenShift UI you should now see the VM we just created starting to deploy and eventually start up. Because the OS image contains the guest-additions package, we are able to collect information from the running vm, including the OS and version it is running:
Logging into our VM
Because the FreeBSD OS image we are using supports cloud-init, when you create a VM from the OpenShift UI, a cloud-init script is attached to the VM and a username/password is automatically generated for your new VM. These can be accessed from the OpenShift web UI as shown below:

Patch FreeBSD
At this point, we will assume that some time has past since we made FreeBSD available as a VM type in our OpenShift Cluster. We are now going to switch back to our OS Engineer persona and patch our base image with the latest patches from the maintainers of FreeBSD. To simulate this, I have run the following commands on a FreeBSD machine and exported the QCOW2 image as a new image, that we will push to our container registry.
$ freebsd-update fetch
$ freebsd-update install
$ pkg upgrade
$ cloud-init clean
$ shutdown -p now
We now need to update our containerDisk with the updated/patched version by updating our Dockerfile to point to the new QCOW2 image:
FROM registry.access.redhat.com/ubi10/ubi:latest AS builder
ADD --chown=107:107 freebsd-14.2-zfs-2025-10-01.qcow2 /disk/
RUN chmod 0440 /disk/*

FROM scratch
COPY --from=builder /disk/* /disk/
With the Dockerfile update, the OS Engineer builds the ContainerDisk podman build -t registry.xphyrlab.net/cloudimages/freebsd-14:latest . and then pushes it to the container registry podman push registry.xphyrlab.net/cloudimages/freebsd-14:latest. This is the only tasks our OS Engineer needs to do, OpenShift will take care of the next steps for us.
DataImportCron update
We have configured our DataImportCron to run once an hour at 7 minutes past, so after waiting for the next job to run, our OpenShift Virtualization Admin can take a look and see what DataVolumes we currently have available in our cluster:
$ oc get datavolumes -n xphyrlab-os-images
NAME                         PHASE       PROGRESS   RESTARTS   AGE
freebsd14-0610dbc3329d     Succeeded   100.0%     1          16h
freebsd14-22aad47aaa51     Succeeded   100.0%                22h
Note that there are now two DataVolumes, one which is newer than the other. We can check the DataSource and confirm that it is now pointing to the newest DataVolume with oc describe DataSource freebsd14 -n xphyrlab-os-images
$ oc describe datasource freebsd14-2 -n xphyrlab-os-images
Name:         freebsd14-2
Namespace:    xphyrlab-os-images
...
Status:
  Conditions:
    Last Heartbeat Time:   2025-10-02T19:28:46Z
    Last Transition Time:  2025-10-02T19:28:46Z
    Message:               DataSource is ready to be consumed
    Reason:                Ready
    Status:                True
    Type:                  Ready
  Source:
    Pvc:
      Name:       freebsd14-0610dbc3329d
      Namespace:  xphyrlab-os-images
Events:           <none>
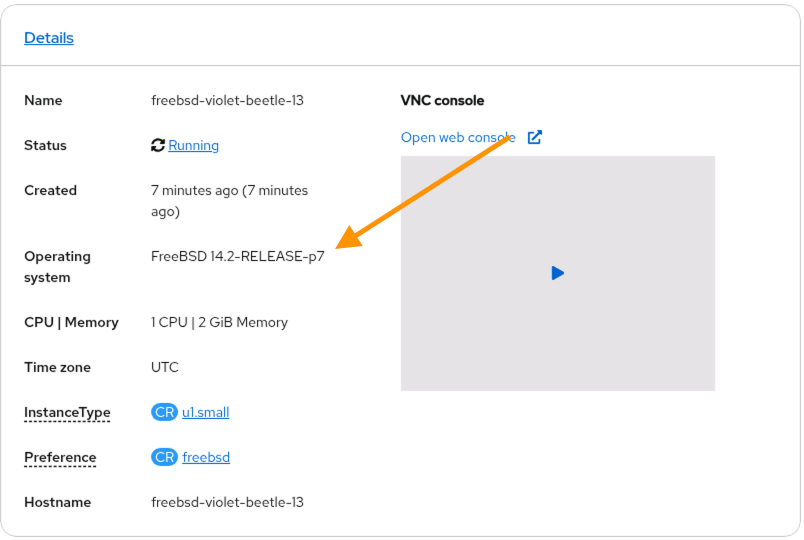
Note that under “Status” we can see that the Source PVC is the latest image.
We can boot it up and see that the system is fully patched.
Upgrade FreeBSD
OK, lets do this one more time, but this time we will update to 14.3. (Stay with me there is one more thing I want to show). Our OS Engineer goes in and does another update, moving our FreeBSD Gold Image to version 14.3 using the following commands:
$ freebsd-update -r 14.3-RELEASE upgrade
$ freebsd-update install
$ pkg update && pkg upgrade
$ reboot
$ cloud-init clean
$ shutdown -p now
Just as before, they update the Dockerfile with the new QCOW2 disk update, create a new version of our ContainerDisk with podman build ..., and publish it to the registry with podman push ....
FROM registry.access.redhat.com/ubi10/ubi:latest AS builder
ADD --chown=107:107 freebsd-14.3-zfs-2025-10-01.qcow2 /disk/
RUN chmod 0440 /disk/*

FROM scratch
COPY --from=builder /disk/* /disk/
Now, lets go check our DataVolumes again and see the updates get pulled in via our DataImportCron task.
DataImportCron update (one last time)
Our friendly neighborhood OpenShift Virtualization Admin uses the oc get datavolumes command, we can now see that we have a new DataVolume available…
$ oc get datavolumes -n xphyrlab-os-images
NAME                         PHASE       PROGRESS   RESTARTS   AGE
freebsd14-22aad47aaa51       Succeeded   100.0%     1          25h
freebsd14-3aabef1f9e10       Succeeded   100.0%                7m31s
But also note that there are still only two DataVolumes listed. This is because when we defined our DataImportCron back in Create DataImportCron we specified two key things:
spec:
  garbageCollect: Outdated
  importsToKeep: 2
By setting importsToKeep to 2, and garbageCollect to Outdated, the DataImportCron controller will take care of ensuring that we do not end up with extra DataVolumes wasting storage space, while also giving us the ability to roll back to the previous version if needed. So we now have an updated DataSource, lets build one last VM and check and see if we get the updated version.
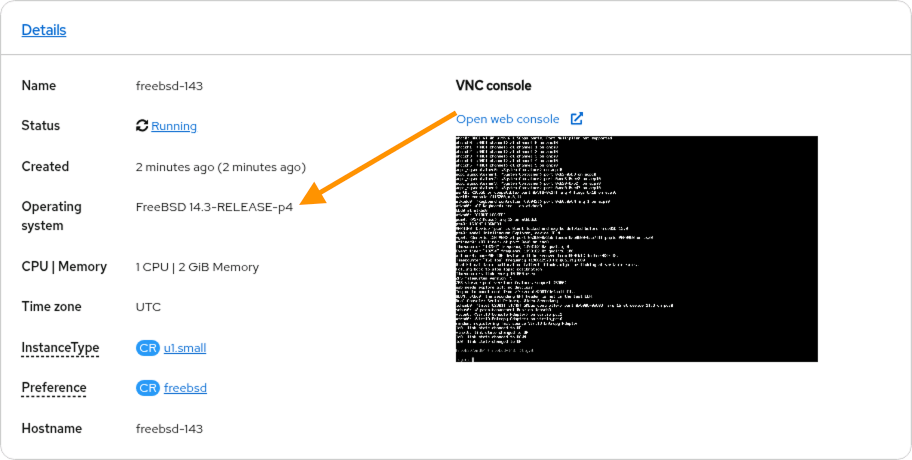
SUCCESS! Our most recent VM is now based on FreeBSD 14.3 thus all VMs built from this DataSource will be patched up to version 14.3.
Bonus Round
OK, so this was great, we used a DataImportCron to automatically track a ContainerDisk that is hosted in our enterprise registry, but what if our OS Engineer does not want to place the GoldDisk images in the container registry, or what if the group that runs the container registry does not want ContainerDisks in the registry. We can accommodate this as well, but with slightly less automation. We will assume that our OS Engineer has supplied us with a URL that we can get our OS image from.
Start by creating a DataVolume that is sourced from the path that our OS Engineering team has given us.
apiVersion: cdi.kubevirt.io/v1beta1
kind: DataVolume
metadata:
  name: "freebsd14-3-2025-09-03"
  namespace: xphyrlab-os-images
spec:
  source:
      http:
         url: "http://172.16.15.6/iso/freebsd-14.2-zfs-2024-12-08.qcow2"
  storage:
    volumeMode: Block
    resources:
      requests:
        storage: "32Gi"
Our OpenShift Virtualization Admin applies the DataVolume definition to the cluster, and then uses the oc describe datavolume freebsd14-3-2025-10-03 -n xphyrlab-os-images and waits for the DataVolume import to complete.
$ oc describe datavolume freebsd14-3-2025-09-03
Name:         freebsd14-3-2025-09-03
Namespace:    xphyrlab-os-images
Labels:       <none>
Annotations:  cdi.kubevirt.io/storage.usePopulator: true
API Version:  cdi.kubevirt.io/v1beta1
Kind:         DataVolume
Metadata:
  Creation Timestamp:  2025-10-03T15:20:51Z
  Generation:          1
  Resource Version:    149182421
  UID:                 4b4a600a-f0ec-48b4-80de-c5635e8a8f43
Spec:
  Source:
    Http:
      URL:  http://172.16.15.6/iso/freebsd-14.2-zfs-2024-12-08.qcow2
  Storage:
    Resources:
      Requests:
        Storage:  32Gi
    Volume Mode:  Block
Status:
  Claim Name:  freebsd14-3-2025-09-03
...
  Phase:                   ImportInProgress
  Progress:                87.54%
Events:
  Type    Reason            Age                 From                          Message
  ----    ------            ----                ----                          -------
  Normal  Pending           2m8s                datavolume-import-controller  PVC freebsd14-3-2025-09-03 Pending
  Normal  ImportScheduled   98s (x2 over 119s)  datavolume-import-controller  Import into freebsd14-3-2025-09-03 scheduled
  Normal  ImportInProgress  19s (x2 over 101s)  datavolume-import-controller  Import into freebsd14-3-2025-09-03 in progress
We can now create a DataSource, that points to the PersistentVolumeClaim of the image we just imported. We will use the Claim Name: from the output above, and update spec.source.pvc.name in the YAML below:
apiVersion: cdi.kubevirt.io/v1beta1
kind: DataSource
metadata:
  labels:
    instancetype.kubevirt.io/default-preference: freebsd
  name: freebsd14-from-http
  namespace: xphyrlab-os-images
spec:
  source:
    pvc:
      name: freebsd14-3-2025-09-03
      namespace: xphyrlab-os-images
The OpenShift Virtualization Admin now has a new Bootable Volume called freebsd14-from-http that VMs can be created from.
To update the image, the OpenShift Virtualization Admin needs only to create a new DataVolume and update the DataSource with the new volume.
apiVersion: cdi.kubevirt.io/v1beta1
kind: DataVolume
metadata:
  name: "freebsd14-3-2025-10-02"
  namespace: xphyrlab-os-images
spec:
  source:
      http:
         url: "https://172.16.15.6/iso/freebsd-14.3-zfs-2025-10-02.qcow"
  storage:
    volumeMode: Block
    resources:
      requests:
        storage: "32Gi"
NOTE: In the above YAML we created a NEW DataVolume called
freebsd14-3-2025-10-02that points to an UPDATED QCOW2 file from the OS Engineer
Finally the OpenShift Virtualization Admin updates our DataSource definition with the new PVC volume name
apiVersion: cdi.kubevirt.io/v1beta1
kind: DataSource
metadata:
  labels:
    instancetype.kubevirt.io/default-preference: freebsd
  name: freebsd14-from-http
  namespace: xphyrlab-os-images
spec:
  source:
    pvc:
      name: freebsd14-3-2025-10-02
      namespace: xphyrlab-os-images
Apply the updated yaml file oc apply -f freebsd14-from-http.yaml and the DataSource will be updated to point to the new PVC. Any new VMs created from the DataSource will now be using the latest image. The process we just completed above could be scripted using Ansible, or other automation tools to completely automate the monthly update process, but we will leave that for another blog post, or for you the reader to develop on your own.
Conclusion
So as promised at the beginning of this post, we have created a process that allows our fictional OS Engineer to provide a base Gold Image that is updated as they see fit, and OpenShift will automatically pull it into this cluster (and any other cluster that has been configured with the same DataImportCron task). We also covered how to manually handle this if you are not able to keep ContainerDisks in your corporate registry. We also successfully deployed FreeBSD14 in our cluster, and made it available for all users of the cluster. In a future blog post we will take a look at the work that the OS Engineer is doing, and see if we can automate this in OpenShift Virtualization.
References
- Openshift Virtualization: Creating Images, Bootable Volumes, and Templates
- Automated OS image import, poll and update
- Auto-Updating VM OS Base Images with KubeVirt’s Containerised Data Importer