So I bought a Turing Pi 2 awhile back. It has been sitting on my shelf for about 6 months now just waiting for me to do something with it… and today is the day. What is a Turing Pi 2 you ask? Lets let the folks from Turing Pi tell you:
- The Turing Pi 2.5 is a 4-node mini ITX cluster board with a built-in Ethernet switch that runs Turing RK1, Raspberry Pi CM4 or Nvidia Jetson compute modules in any combination.
Or in other words, a compact Single Board Computer (SBC) cluster. I have always had a fascination with single board computers, and have quite the collection of them collecting dust in my basement. So two years ago when I saw that someone was building a mini ITX board that would power and network four of these boards at once, I jumped at the chance to fund it on Kickstarter. The board along with four Turing RK1 compute modules arrived about six months ago, and all of it sat and collected dust in my basement until last weekend.
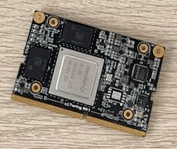
OK, so now you are asking what is a Turing RK1 compute module. Well, you can think of it as a Raspberry Pi compute module, but with a different processor, more memory and a TPU on board. So basically a little bit more capable Raspberry Pi. There are some limitations, the biggest of which is that due to the nature of ARM devices, Linux distributions need to be specifically designed for each board, and the Fedora image that works on a Raspberry Pi 5, won’t necessarily run on a Turing RK1 module.
My ultimate goal is to get this setup running OpenShift, but before I go down that road, I wanted to see if I could get just a base Kubernetes cluster up and running on this system. The official Turing Pi 2 docs have instructions for installing a Kubernetes cluster using Ubuntu and K3s, but I also came across something called Talos Linux and was intrigued.
Talos Linux is “Linux designed for Kubernetes – secure, immutable, and minimal.”, which seems very similar to the mantra and the goals of Red Hat CoreOS and OpenShift. So with this in mind, I decided that Talos Linux would be my OS of choice to install on my Turing Pi Cluster. Talos is very much a “no frills” Kubernetes distribution, so we will add a few additional apps including Headlamp for our UI and Longhorn Storage for persistent storage.
Before You Begin
We will be installing Talos Linux on a Turing Pi 2 cluster. This is a fairly esoteric piece of hardware, if you are looking for a Talos install blog, I suggest checking somewhere else. The instructions below will assume you are using a Turing Pi 2, with three or more Turing RK1 carrier boards. Each RK1 in my cluster has 16GB of RAM and a 1TB NVME card.
You will need the Talos command line tool “talosctl”, which can be downloaded here: https://github.com/siderolabs/talos/releases Note that we will be using version 1.9.4 in this blog post, so I suggest downloading the same version of the talosctl utility. You can also use brew install talosctl from a Mac.
You will also need the “kubectl” command line tool, as well as “helm”. These can be obtained from their respective websites.
Downloading the Talos Install Image
Talos has a tool that creates an install image specific for the hardware that you are installing on called the Talos Image Factory (https://factory.talos.dev). Follow the prompts to select a “Single Board Computer” and then version 1.9.4, and then select the SBC you are trying to use (Turing RK1). Finally, when prompted for additional modules, make sure that you include the “iscsi” module if you plan to use Longhorn storage for your cluster. You should not need to configure any additional options for your Talos Install. Use the download URL provided to download the boot image to your local machine.
Once you have downloaded the image, be sure to uncompress the image using the xz tool:
$ xz -d metal-arm64.raw.xz
With a copy of the boot image available, lets go ahead and install the boot image on all of our nodes. We can either do this from the Turing Pi Web interface, or we can do this via the command line of the Turing Pi BMC. Which ever process you decide to use, the Turing Pi will install the downloaded boot image to the onboard 32GB eMMC of the Turing RK1.
NOTE: The both flash processes will let you “flash” a running card, but this process will fail. Always make sure that the board is powered off prior to flashing the boot device.
Flashing a node from command line
If you want to flash your RK1 SBCs from the command line, you will need to copy the metal-arm64.raw file to the Turing Pi BMC. The BMC does not have local storage, so you will need to install and configure an SD card per the instructions for Using SD card with Turing Pi 2 BMC. The card will be automatically mounted at /mnt/sdcard on the BMC. If you do not have a SD card installed, you will need to use the Web UI to flash your nodes.
To start we will need to SCP the metal-arm64.raw file over to this location:
$ scp metal-arm64.raw.xz root@<turingpi-bmc-ip>:/mnt/sdcard
With the file copied over to the BMC, we will SSH to the BMC so we can run our commands:
$ ssh root@<turingpi-bmc-ip-address>
Password:
#
Now that you are logged in, we can use the built in tpi command to flash the image to a node. We will issue a command to power off the card, prior to flashing the card.
# tpi power -n  <node number> off
# tpi flash -l -i /mnt/sdcard/metal-arm64.raw -n <node number>
Flashing from image file /mnt/sdcard/metal-arm64.raw...
⠂ [00:01:40] [##########################################>------------------------] 894.05 MiB/1.22 GiB (39.6s)
⠚ Verifying checksum...
Done
Repeat this process for each of the nodes you want to use in your Talos cluster. In this blog post, we will be using three nodes.
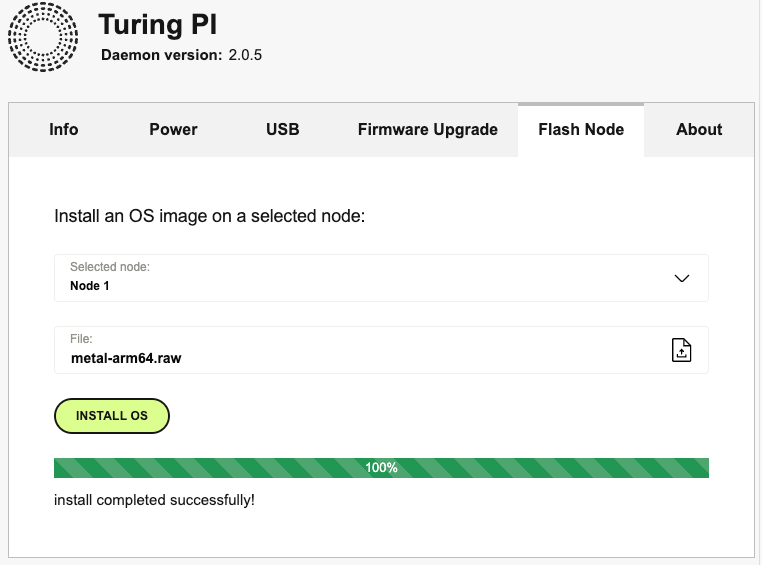
Flashing a node from Web UI
You can also flash the RK1 cards using the Turing Pi BMC Web interface. Once you log into the Web UI select the Power tab, and ensure that the node(s) you are going to flash are powered off. Next select the Flash Node tab. Select the node, and then click the “File” area to select the metal-arm64.raw file you downloaded and uncompressed earlier. Then click Install OS. You will be prompted to make sure you want to overwrite the existing OS. You can select “Continue” and let the system flash the image. The process takes about 5 minutes per node.
Starting the Talos Install
Once you have flashed all 4 nodes, you will need to power them on, and identify the network address of each of the nodes. If you are unable to identify the IP addresses from your DHCP server, you will need to ssh into the Turing Pi and run the commands listed below to get your node information from the console of each RK1 node.
Retrieving the Node IP addresses
You will need to SSH to the Turing Pi BMC and power on each of your nodes. Once the nodes are running, we will connect to the serial console of each node, and get the IP address of the node.
Run the following commands to start each node and then get the IP address for the node:
$ tpi power -n  1 on
ok
$ tpi power -n  2 on
ok
$ tpi power -n  3 on
ok
$ tpi uart -n <Node Number> get
[   14.054632] [talos] this machine is reachable at: {"component": "controller-runtime", "controller": "runtime.MaintenanceServiceController"}
[   14.068706] [talos]  172.16.15.60 {"component": "controller-runtime", "controller": "runtime.MaintenanceServiceController"}
[   14.081186] [talos] adjusting time (jump) by 482709h33m37.28896514s via 172.16.15.1, state TIME_OK, status STA_NANO {"component": "controller-runtime", "controller": "time.SyncController"}
[   14.100079] [talos] upload configuration using talosctl: {"component": "controller-runtime", "controller": "runtime.MaintenanceServiceController"}
[   14.114829] [talos]  talosctl apply-config --insecure --nodes 172.16.15.60 --file <config.yaml> {"component": "controller-runtime", "controller": "runtime.MaintenanceServiceController"}
[   14.133325] [talos] synchronized RTC with system clock {"component": "controller-runtime", "controller": "time.SyncController"}
[   14.146296] [talos] or apply configuration using talosctl interactive installer: {"component": "controller-runtime", "controller": "runtime.MaintenanceServiceController"}
[   14.163496] [talos]  talosctl apply-config --insecure --nodes 172.16.15.60 --mode=interactive {"component": "controller-runtime", "controller": "runtime.MaintenanceServiceController"}
[   14.181897] [talos] optionally with node fingerprint check: {"component": "controller-runtime", "controller": "runtime.MaintenanceServiceController"}
[   14.197075] [talos]  talosctl apply-config --insecure --nodes 172.16.15.60 --cert-fingerprint 'qS7P8mGP+K1BAs+9AdEHf7uJC28XU1zHbo1fWt5qp4k=' --file <config.yaml> {"component": "controller-runtime", "controller": "runtime.MaintenanceServiceController"}
[   14.222998] [talos] server certificate issued {"component": "controller-runtime", "controller": "runtime.MaintenanceServiceController", "fingerprint": "j9JJw5ldQonUicFderRf7NRlaKGdmGTk/8uAB3RlBZM="}
[   14.727716] [talos] created route {"component": "controller-runtime", "controller": "network.RouteSpecController", "destination": "default", "gateway": "172.16.15.1", "table": "main", "link": "end0", "priority": 1024, "family": "inet4"}
# repeat tpi uart command for each node you will be installing on
Record the IP address for each of the nodes and then proceed to the next step. In the example above we would record 172.16.15.60.
Creating a Config File
We will install Talos onto the RK1’s built in 32Gb storage. There is a way to install to other storage, however given that we are using Talos, which is designed to be installed on limited storage. We will install/configure the OS on /dev/mmcblk0
We will be using Talos Linux’s ability to create a VIP that will be used as the Kubernetes API IP address. This IP will float between the different nodes in the cluster, giving you a highly available KubeAPI endpoint. In order to configure this option, we will need to select an IP address that is not in use on the network that your nodes are on. This IP address should not be a part of your DHCP scope. As an example, the nodes that I am using are on the 172.16.15.0/24 subnet. The DHCP scope assigns IP addresses from 172.16.15.100-200. Given this information, we will assign “172.16.15.64” to our cluster’s VIP.
We are also going to need to configure our NVMe storage. The config file below assumes that you have a NVMe disk installed for each node in your cluster and that you will be using Longhorn Storage for your cluster storage.
Finally, since we are building a 3 node cluster, we need to ensure that allowSchedulingOnControlPlanes is enabled, so that we can run apps other than the Kubernetes control plane. Create a new file called cp.patch.yaml with the following contents, making sure to update the VIP IP for your network.
| |
NOTE: There is some additional configuration to enable the Kubernetes metrics server, which makes the Headlamp Dashboard that we configure later on in this blog more useable. If you don’t wish to use the metrics server, remove the
kubelet.extraArgsandcluster.extraManifestssections of the file above. (lines 2-4 and 19-21)
With our yaml file created, we will go ahead and use the talosctl command to generate our configuration files.
$ talosctl gen config turingpi https://172.16.15.64:6443 --config-patch-control-plane @cp.patch.yaml
generating PKI and tokens
Created /home/markd/talos_clusters/test2/controlplane.yaml
Created /home/markd/talos_clusters/test2/worker.yaml
Created /home/markd/talos_clusters/test2/talosconfig
Keep these files safe for future use. These files are also used to do things like expanding your cluster at a later time, including adding additional worker nodes.
Applying the configuration to the cluster
Its now time to apply our configuration to our running nodes. We will again use the talosctl command to apply the configuration to each node. Be sure to update the commands to point to the IP addresses you retrieved when the modules were first powered on.
$ export TALOSCONFIG=$(pwd)/talosconfig
$ talosctl apply-config --insecure -n 172.16.15.60 --file controlplane.yaml
$ talosctl apply-config --insecure -n 172.16.15.61 --file controlplane.yaml
$ talosctl apply-config --insecure -n 172.16.15.62 --file controlplane.yaml
We need to wait about two minutes for the initial config to be applied to the node. If you are still connected to the Turing Pi BMC, run the tpi uart -n 1 get command and look for text stating that the node is ready to be bootstrapped.
# tpi uart -n 1 get
[ 4789.704545] [talos] etcd is waiting to join the cluster, if this node is the first node in the cluster, please run `talosctl bootstrap` against one of the following IPs:
[ 4789.721709] [talos] [172.16.15.60]
Now use the talosctl command to bootstrap the first node:
$ export TALOSCONFIG=$(pwd)/talosconfig
$ talosctl bootstrap --nodes 172.16.15.60 --endpoints 172.16.15.60
NOTE: if you get errors about insecure connections, check and ensure that TALOSCONFIG points to your proper talos config file
At this point the Talos cluster should be completing the configuration. We can check on the status, but first we need to update the talosconfig file with some additional information about our cluster.
Updating talosconfig file with endpoints and nodes
The talosconfig file is used to store information on how to connect to the Talos cluster. In order to make future commands easier to run, we will update this config file with our IP addresses that are in use for the cluster.
$ talosctl config endpoint 172.16.15.64
$ talosctl config node 172.16.15.60 172.16.15.61 172.16.15.62
Checking status of the install
With the talosconfig file updated, we can check the status of the install. We will again use the talosctl command to check the status of our cluster using the talosctl health command.
$ talosctl health --nodes 172.16.15.60 --endpoints 172.16.15.60
waiting for etcd to be healthy: OK
waiting for etcd members to be consistent across nodes: OK
waiting for etcd members to be control plane nodes: OK
waiting for apid to be ready: OK
waiting for all nodes memory sizes: OK
waiting for all nodes disk sizes: OK
waiting for no diagnostics: OK
waiting for kubelet to be healthy: OK
waiting for all nodes to finish boot sequence: OK
waiting for all k8s nodes to report: OK
waiting for all control plane static pods to be running: OK
waiting for all control plane components to be ready: OK
waiting for all k8s nodes to report ready: OK
waiting for kube-proxy to report ready: OK
waiting for coredns to report ready: OK
waiting for all k8s nodes to report schedulable: OK
Reviewing the output above we can see that the control plane has started, and that all nodes are reporting as schedulable. At this point, we can start to access the cluster. We will start by retrieving the kubeconfig file for authentication.
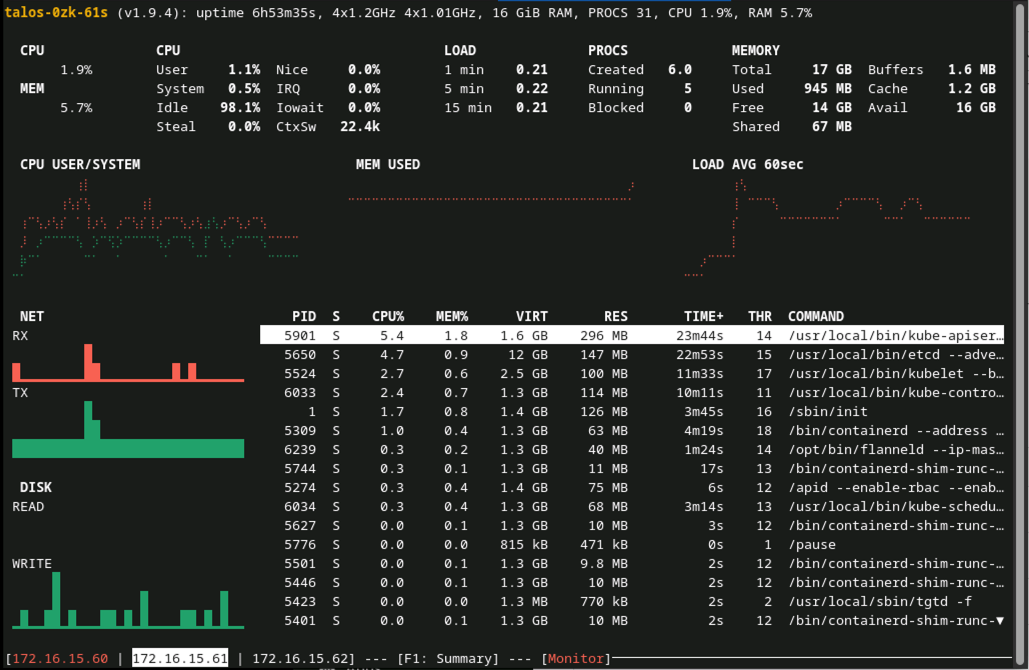
There is also an integrated console “dashboard” that can be displayed in your terminal using talosctl dashboard and you will get something like this:
Generate a kubeconfig file
With the cluster build complete, we will retrieve our kubeconfig file which we will use to connect and manage our new cluster going forward. Run the talosctl kubeconfig command to retrieve the file to your current directory:
$ talosctl kubeconfig ./kubeconfig --nodes 172.16.15.60
$ export KUBECONFIG=$(pwd)/kubeconfig
# lets test to ensure it works
$ kubectl get nodes
NAME            STATUS   ROLES           AGE     VERSION
talos-e7f-yia   Ready    control-plane   2m37s   v1.32.2
talos-hba-di1   Ready    control-plane   2m46s   v1.32.2
talos-uor-0qo   Ready    control-plane   4m55s   v1.32.2
We have shown a quick command line dashboard that shows the underlying Talos OS statistics above, but what about a Kubernetes dashboard. Lets handle that next.
Deploying a Dashboard
Talos does not come with a built in dashboard. Instead, we will use Headlamp to connect to our cluster and view its state. Headlamp can be installed in the cluster, or as a local application. For now, we will install the local application, and connect to our remote cluster.
NOTE: It is also possible to install Headlamp as a hosted application in your cluster, however this requires additional configuration for authentication that we will not go into today.
Follow the the instructions for your platform for installing Headlamp on your machine, and then run the program. You will need to point it to the kubeconfig file that you created in Generate a kubeconfig file.
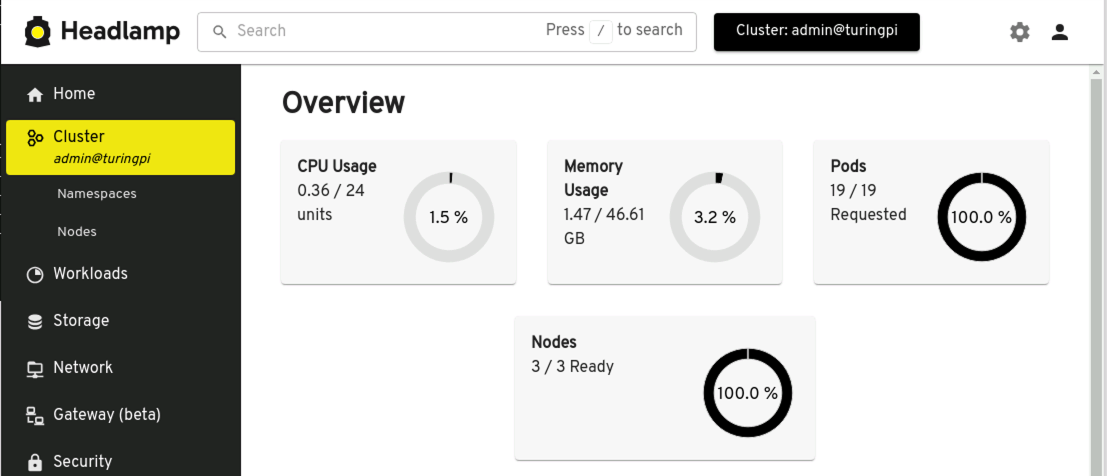
We can now use the UI, to browse the cluster, look at running pods, and retrieve logs and connect to the terminal of the pods. If you enabled the Kubernetes Metrics Server during install, you can also see some of the “speeds and feeds” of the cluster and how the overall cluster is performing.
Creating Storage
Now a days, a Kubernetes cluster is not much use without some form of local storage. We could use something like the NFS CSI driver for Kubernetes, but since we have local NVMe storage available, lets make use of that. Longhorn Storage is a very simple to deploy Kubernetes storage system that takes up little resources to run.
Create the longhorn-system namespace and give privileged security in order to access the local storage, and iSCSI subsystem.
$ kubectl create ns longhorn-system
namespace/longhorn-system created
$ kubectl label namespace longhorn-system pod-security.kubernetes.io/enforce=privileged
We will use Helm to apply the Longhorn Helm repo and manage the deployment.
$ helm repo add longhorn https://charts.longhorn.io
$ helm repo update
$ helm install longhorn longhorn/longhorn --namespace longhorn-system --version 1.7.2
Longhorn will take a few minutes to install and configure itself.
Connecting to the LongHorn UI
Once done, we can check on the status of the system by using the kubectl port-forward command to access the remote UI.
$ kubectl -n longhorn-system port-forward service/longhorn-frontend 50483:80
Open a web browser on your local workstation, and connect to http://localhost:50483 and you will be able to see the status of the LongHorn storage:

As you can see from the screenshot above, we now have a Longhorn storage system up and running in our cluster, with about 1.9Tb of storage available for provisioning.
Conclusion
Unlike many of my posts where its all technical and no opinion, I feel this post requires a little additional thoughts at the conclusion. Talos is a very interesting Kubernetes distribution, it is clear that the creators of Talos, Sidero Labs have many of the same goals in mind as Red Hat CoreOS and OpenShift. Things like an immutable OS, ease of install, and automated upgrades are key focus points of Talos, making it much easier to manage than a “roll-your-own” K8s cluster. It is however very much still a “Choose Your Own Adventure” style Kubernetes. Unlike OpenShift where the batteries and the kitchen sink are included, in a very opinionated way… Talos insists that you choose all of the individual components that will make a Kubernetes cluster a true Enterprise platform. Things like a UI, the storage layer, Ingress, Gateway API, service mesh, orchestration, gitops, etc. While this level of customization may be welcomed by many, it can make supporting such a cluster more complicated for large enterprises as you will need to have support contracts with multiple vendors, and ensure that they all work together for your best interest.
That being said, for very custom deployments, or clusters that do not need all the “bells and whistles” that OpenShift provides, Talos is a VERY interesting Kubernetes distribution. It appears to cover what I feel are the fundamentals of any good Kubernetes distribution, keeping the base OS and Kubernetes platform working together in lock step with OS configuration an integral part of the overall platform.
In this blog post we have seen how to install Talos Linux on a Turing Pi using Turing RK1 compute nodes. In a future post, we will look to deploy some actual workloads in this cluster and test the system out, so if you are interested in this sort of thing, be sure to keep an eye out for future posts.