When it comes to migrating VMs from VMware to OpenShift Virtualization, the Migration Toolkit for Virtualization (MTV) is the easiest option. But what happens if you want to move an unsupported OS over to OpenShift Virtualization? Can this even be done? The short answer is “Yes”, and the longer answer is “It depends on the OS you want to move.”
MTV supports modern RHEL and Microsoft Windows based OSes. You may also find that virt-v2v2 the underlying technology behind MTV supports additional OSes such as Fedora derived distributions and some distributions based on Debian. The full list of officially supported OSes can be found on the Certified Guest Operating Systems in Red Hat OpenShift Virtualization.
In this post we will cover the process to move a non-supported OS, (in this case an Alpine Linux virtual machine) but the process will work for any OS. Keep in mind, that if you are moving over a “non-supported” OS, Red Hat will not be able to offer support for any problems that you may run into.
Note: Red Hat does not directly support “Third Party OSes” (those OSes not listed on the Certified Guest Operating Systems page). Red Hat’s support statement for Third Party OSes can be found here: Third-party Guests
With the “legalese” out of the way. Lets get to moving an Alpine Linux VM over to OpenShift Virtualization.
Prerequisites
In order to try this process you will need an operating OpenShift cluster with OpenShift Virtualization installed and a working storage CSI driver.
- Administrator level privileges in the cluster
- The OpenShift oc command-line tool
- The
qemu-imgtool for converting the vmdk to qcow image format - The
virtctlcommand for uploading the disk image to - The
govccommand if you want to export your VM from the command line - Storage that supports RWX so that VMs can migrate between nodes
Exporting your VM from vCenter
In order to start the process, you are going to need to export the VM from vCenter. In order to export the VM, you will need to have Administrator access to vCenter. Log into the vSphere client, and find the VM you want to move.
- Shut down the VM (the vm must be powered off to export)
- Right Click on the VM, and select “Template->Export OVF Template”
- Enter a name for the VM export, eg “alpninetest”
- Select “Advanced” and be sure to select all the additional options
- Click OK
NOTE: vSphere will create multiple “pop-up” windows (one per file), if you have a pop-up blocker enabled, be sure to disable it, or add your vSphere server to your allowed list.
Using GoVC
It is also possible to export the VM using a command line tool called govc. The govc tool will allow us to export a virtual machine from vSphere, allowing us to skip the GUI. The tool is available for multiple platforms including Linux, Windows and OSX. To use govc you will need to set some environment variables as shown below, and then you can run the export.ovf command.
$ export GOVC_URL=myvcenter.name.com
$ export GOVC_USERNAME=myuser
$ export GOVC_PASSWORD=MyP4ss
$ export GOVC_INSECURE=true
$ govc datacenter.info
Name:                Home
  Path:              /Home
  Hosts:             3
  Clusters:          1
  Virtual Machines:  43
  Networks:          17
  Datastores:        10
$ govc export.ovf -vm alpninetest alpninetest
[05-06-24 16:53:57] Downloading alpninetest-disk-0.vmdk... OK
Convert VMDK
Once the virtual machine has been exported, we need to find the “vmdk” file, as this is the primary boot disk. Check your Download directory (if using the GUI), or check the directory that was created using govc for your “.vmdk” files. These are your virtual machine disks.
NOTE: if you have multiple VMDK files in your download directory this means you have multiple virtual disks. Each VMDK will need to be converted and uploaded individually when we configure our OpenShift Virtualization machine.
In our working example, the name of the vmdk is alpninetest.vmdk. We will use this file with the qemu-img command and convert it to qcow2 format.
$ qemu-img convert -cpf vmdk -O qcow2 alpninetest.vmdk alpninetest.qcow2
    (100.00/100%)
$ ls
alpninetest.qcow2  alpninetest.vmdk
Upload your QCOW2 image to OpenShift Virtualization
With our virtual machine disk image converted to qcow2 format, we can now upload the file to OpenShift. We will create a new project for this virtual machine called myvms and then use the virtctl command to upload the disk image to OpenShift:
$ oc login
$ oc new-project myvms
$ virtctl image-upload dv alpnine-root --size=33Gi --image-path=alpninetest.qcow2
PVC myvms/alpnine-root not found
DataVolume myvms/alpnine-root created
Waiting for PVC alpnine-root upload pod to be ready...
Pod now ready
Uploading data to https://cdi-uploadproxy-openshift-cnv.apps.acm.xphyrlab.net

 478.56 MiB / 478.56 MiB [==============================] 100.00% 9s

Uploading data completed successfully, waiting for processing to complete, you can hit ctrl-c without interrupting the progress
Processing completed successfully
Uploading alpninetest-1.qcow2 completed successfully
We can validate that the disk is ready with the oc command:
$ oc get datavolume
NAME                   PHASE         PROGRESS   RESTARTS   AGE
alpnine-root           Succeeded     N/A                   9d
$ oc get pvc
oc get pvc
NAME                   STATUS        VOLUME                                     CAPACITY      ACCESS MODES   STORAGECLASS   AGE
alpnine-root           Bound         pvc-2babb646-3f49-4777-9bc4-8927a4719735   37495746235   RWX            nfs-csi        9d
We now have our boot source. Its time to create our skeleton VirtualMachine and try booting our virtual machine.
Create Virtual Machine
As I have said many times before “everything in OpenShift is just YAML”, and OpenShift Virtualization VMs are no different. We will use the following YAML as a template to create a new virtual machine that boots the disk image that we exported and then imported into OpenShift Virtualization.
apiVersion: kubevirt.io/v1
kind: VirtualMachine
metadata:
  name: myalpinevm
  namespace: myvms
  labels:
    app: myalpinevm
spec:
  running: false
  template:
    metadata:
      labels:
        kubevirt.io/domain: myalpinevm
    spec:
      architecture: amd64
      domain:
        cpu:
          cores: 1
          sockets: 1
          threads: 1
        devices:
          disks:
            - bootOrder: 1
              disk:
                bus: virtio
              name: rootdisk
          interfaces:
            - macAddress: '00:50:56:86:9b:41'
              masquerade: {}
              model: virtio
              name: default
          networkInterfaceMultiqueue: true
          rng: {}
        machine:
          type: q35
        memory:
          guest: 2Gi
        resources: {}
      networks:
        - name: default
          pod: {}
      terminationGracePeriodSeconds: 180
      volumes:
        - name: rootdisk
          persistentVolumeClaim:
            claimName: alpnine-root
Pay particular attention to lines 17-20, 37 and 45 above. You will want to update those sections to match the source VM configuration as well as the name of the datavolume you created in the Upload your QCOW2 image to OpenShift Virtualization above.
Booting your VM for the first time
Depending on your Virtual Machine OS, and how the original VM was created, there are multiple things that may keep your VM from booting. These include options such as:
- VM Machine Compatibility - q35 (Q35 + ICH9, 2009) vs pc (i440FX + PIIX, 1996)
- Firmware Compatibility - BIOS vs UEFI
- Storage Controller Compatibility - SATA, SCSI or VirtIO
- Network Controller Compatibility - VirtIO, e1000e
Log into OpenShift and navigate to your virtual machine under Virtualization->“VirtualMachines”. Select “Actions”, and then “Start”. After a short period of time, your VM should start. Select the console and see what you get. If your machine boots successfully, congratulations, you can skip to the Network Controller Compatibility section. If however your OS does not boot, move onto the next section about validating your firmware.
Firmware Compatibility
The default VM instance we created in the Create Virtual Machine section above assumes that your VM is booting via BIOS. You can validate how your source VM is booting by checking the following in vSphere:
- Select your vm in vSphere
- Select Actions -> Edit Settings
- Select VM Options
- Expand the Boot Options section
- Note the “Firmware” type is either EFI or BIOS
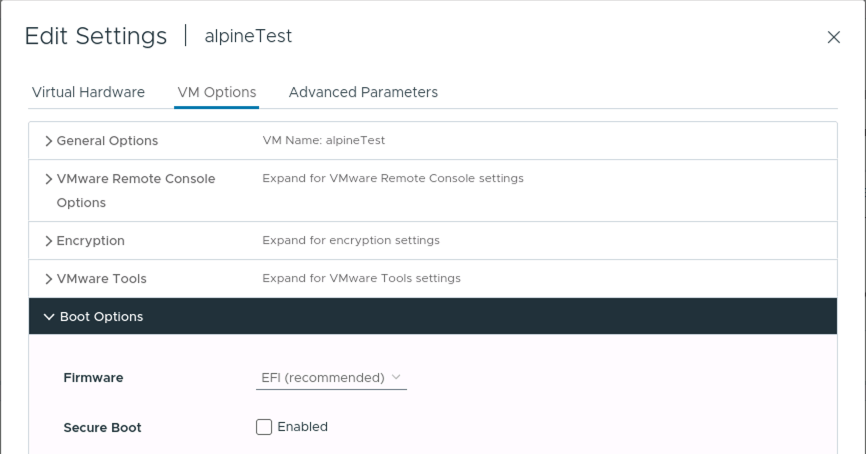
If the Firmware type is EFI, take note of if “Secure Boot” is selected. If Secure Boot is selected, your migration may not work.
NOTE: If your source VM is using BIOS, then move onto the Storage Controller Compatibility section below.
If your VM is using EFI boot, you will need to update the machine configuration to include the following additional YAML:
spec:
  template:
    spec:
      domain:
        features:
          acpi: {}
        firmware:
          bootloader:
            efi:
              secureBoot: false
Power your virtual machine off and edit your virtual machine definition in the OpenShift UI and add the firmware.bootloader section as shown above. Ensure that you save your changes, and then power on the virtual machine. If your machine boots successfully, congratulations, you can skip to the Network Controller Compatibility section. Otherwise, move onto the next section.
Storage Controller Compatibility
OpenShift Virtualization has support for three different types of disk controllers, SATA, SCSI or VirtIO. Your best performance will come from SCSI or VirtIO, your best level of compatibility will come from the SATA controller as most OSes support SATA. Keep in mind that should you use the SATA controller you will not achieve the highest throughput from the disk, but it may be your best opportunity to get a non-standard OS to boot. If you are moving a Linux VM with a modern kernel, you may be able to use the VirtIO controller without any additional drivers.
To update your storage controller update the following section of your virtual machine YAML
spec:
  template:
    spec:
      domain:
        devices:
          disks:
            - bootOrder: 1
              disk:
                bus: sata
              name: rootdisk
Power your virtual machine off and edit your virtual machine definition in the OpenShift UI and change the spec.devices.disk.disk.bus section to either scsi or sata as shown above. Ensure that you save your changes, and then power on the virtual machine. If your machine boots successfully, congratulations, you can skip to the Network Controller Compatibility section.
VM Machine Compatibility Compatibility
If you have made it this far, and your virtual machine is still not booting you can try one last setting change. OpenShift virtualization has support for two machine chip sets “Q35” which is based on the Intel ICH9 architecture, and “PC” which is based on the I440FX architecture. It may be possible that the OS you are trying to boot does not support the ICH9 architecture. By updating the machine.type to “pc”, we can fall back to the I440FX architecture.
spec:
  template:
    spec:
      domain:
        machine:
          type: pc
Power your virtual machine off and edit your virtual machine definition in the OpenShift UI and change the spec.domain.machine.type section to pc_ as shown above. Ensure that you save your changes, and then power on the virtual machine. If your machine boots successfully, congratulations, you can skip to the Network Controller Compatibility section. If you are still unable to boot your virtual machine, at this point there are no more “geek knobs” to turn, and OpenShift Virtualization can not run your legacy OS.
Network Controller Compatibility
If you made it this far, your legacy or third part OS has booted, and you want to be able to access it from the network. Use the OS native tools to check for a network device. If you are unable to locate a network device you may need to install the VirtIO network driver if it is available for your OS. If there is no VirtIO driver available for your OS, you can change the network card type.
OpenShift supports both the VirtIO and e100e emulation. Again, when you are trying to get your network running, the most performant network adapter will be the virtio driver, but if that does not work, you may be able to use the e1000e network adapter which is based on the Intel e1000 network adapter. In order to select your network adapter type, you need to update the following section of your virtual machine definition:
spec:
  template:
    spec:
      domain:
        devices:
          interfaces:
            - macAddress: '00:50:56:86:9b:41'
              masquerade: {}
              model: e100e
              name: default
Power your virtual machine off and edit your virtual machine definition in the OpenShift UI and change the spec.domain.devices.interfaces.model section to e100e_ as shown above. Ensure that you save your changes, and then power on the virtual machine. If your OS has support for the Intel e1000e card you should now have networking available.
Pointer Device Support - Optional
If you are working with an OS that has a GUI, and you plan to connect to the GUI console, you may want to enable the “tablet” input device:
spec:
  domain:
    devices:
      inputs:
      - type: tablet
        bus: virtio
        name: tablet1
This will create a tablet interface on the virtio bus. If your OS does not support virtio you amy try using usb instead.
Installing the Guest Agent in your VM
Once your virtual machine is booting, and you have the network connecting, you should install the QEMU Guest Agent software on the VM for best operation. The QEMU Guest Agent allows communication between the host machine and the virtual machine. This allows for things like gathering data about the guest OS as well as running certain commands like sync for the filesystem. It is suggested that you install the QEMU Guest Agent on your VM for the best experience with your hosted virtual machine.
Conclusion
The process you will need to follow to get a “non-supported” VM running in OpenShift Virtualization will vary based on the specific needs of your virtual machine. This is a trial and error process, but you should be able to find the proper geek knobs to turn by following the directions in this post to get your VM up and running on OpenShift Virtualization.