Two years ago I wrote about using the Synology CSI driver in OpenShift in the post Using the Synology K8s CSI Driver with OpenShift. Since then, Synology has released a newer version of the CSI driver that supports more than just iSCSI and SMB, adding support for the NFS protocol. In this post, we are going to take another look at the driver and see how it works with iSCSI, and NFS.
In addition we will cover a few additional settings that are currently required to make the Synology CSI driver to work properly with OpenShift Virtualization and Kubevirt. These settings will allow for much faster virtual machine creation, by enabling things like snapshots and clones of existing PVCs.
Features of the CSI Driver
Before we begin, lets talk briefly about the protocols and features that the current CSI driver supports. Most Synology arrays have support for iSCSI, NFS and SMB storage protocols. Each protocol has its own unique advantages and disadvantages.
- iSCSI - best for Block storage, allowing raw block devices to be accessed by multiple servers at once. This feature allows for things like the migration of virtual machines from one node to another with Kubevirt and OpenShift Virtualization. It also supports file access, however only one node can access the storage at a time when the volume has a filesystem on it.
- NFS - NFS is best for when you have a filesystem that needs to be accessed by multiple pods, or applications at once. The NFS protocol ensures that file access and locking is in place to keep file corruption from occurring. Typically NFS is used in Linux/Unix systems but it is available in Windows as well. It is recommended that you use version 4.1 of the NFS protocol.
- SMB - SMB is the default file sharing protocol for Windows, but it also works with Linux/Unix systems. In theory this should work with things like Windows Containers, however I have not yet tested this. Stay tuned for a future post on this.
The Kubernetes CSI driver framework supports multiple features, such as Cloning, Expansion and Snapshots. These features allow for creating backups of your storage, and also the ability to quickly copy existing PVCs. We will cover this more in the section on Using the Synology CSI Driver with OpenShift Virtualization/Kubevirt.
| Protocol | RWX | RWO | Cloning | Expansion | Snapshots |
|---|---|---|---|---|---|
| iSCSI-block | X | X | X | X | X |
| iSCSI-file | - | X | X | X | X |
| NFS | X | X | X | X | X |
| SMB | X | X | X | X | X |
When selecting a protocol to use, you will need to keep in mind that your workload will determine which protocol or protocols you will need in your cluster. The iSCSI protocol will allow you to have both “block” and “filesystem” volumeMode PVCs. While the volumeMode block can be used in the ReadWriteMany accessMode, it can only be used in ReadWriteOnce accessMode when the volumeMode is filesystem. Both NFS and SMB do not support the volumeMode block, but have the ability to support ReadWriteMany when the volumeMode is set to filesystem. In many cases, having both iSCSI and NFS storageClasses defined in your cluster will give you the best set of options to work with.
NOTE: I am specifically leaving out SMB at this time from the rest of this blog post as I have not tested it with OpenShift.
Requirements
In order to make use of the Synology CSI driver you will need to have a Synology device running DSM version 7.0 or higher. In addition, in order to use features like Hardware assisted cloning, and snapshots, your Synology must be using the BTRFS filesystem. If you created your storage volume using ext4, or you have an older Synology array that does not support BTRFS some features such as Snapshots as well as Clones of NFS and SMB PersistentVolumes will not work. Hardware assisted cloning of iSCSI LUNS should still work.
Installing the CSI driver
This blog post will walk you through the manual steps for installing the Synology driver. There are other ways to install the driver (including the use of Helm), however these do not have the required SCC, or StorageProfiles out of the box. In order to deploy the Synology CSI driver in OpenShift we will need to clone the git repository.
$ git clone https://github.com/SynologyOpenSource/synology-csi.git
$ cd synology-csi
Create the configuration files
Next we will need to make a copy of the client-info-template.yml and edit it to ensure that it has the proper information for YOUR Synology device:
$ cp config/client-info-template.yml config/client-info.yml
$ vi config/client-info.yml
Be sure to update the username, password and ip address to match your Synology device.
Once you have created your client-info.yml file, we will create a new project for the synology csi driver to run in, and then create the client-info-secret which contains the information on connecting to your array.
$ oc new-project synology-csi
Now using project "synology-csi" on server
$ oc create secret generic client-info-secret --from-file=./config/client-info.yml
secret/client-info-secret created
Move the default storageClass definition file into the config directory, we will come back to this file in the section Creating Synology Storage Classes.
$ mv deploy/kubernetes/v1.20/storage-class.yml config/storage-class-iscsi.yml
Create SCC and Apply to Cluster
Because we are using OpenShift, we need to address the Security Context Constraints or SCC. The SCC below will allow the components of the Synology CSI driver to properly operate in an OpenShift cluster. Create a file called synology-csi-scc.yml with the following contents:
 1---
 2kind: SecurityContextConstraints
 3apiVersion: security.openshift.io/v1
 4metadata:
 5  name: synology-csi-scc
 6allowHostDirVolumePlugin: true
 7allowHostNetwork: true
 8allowPrivilegedContainer: true
 9allowedCapabilities:
10- 'SYS_ADMIN'
11defaultAddCapabilities: []
12fsGroup:
13  type: RunAsAny
14groups: []
15priority:
16readOnlyRootFilesystem: false
17requiredDropCapabilities: []
18runAsUser:
19  type: RunAsAny
20seLinuxContext:
21  type: RunAsAny
22supplementalGroups:
23  type: RunAsAny
24users:
25- system:serviceaccount:synology-csi:csi-controller-sa
26- system:serviceaccount:synology-csi:csi-node-sa
27- system:serviceaccount:synology-csi:csi-snapshotter-sa
28volumes:
29- '*'
Create the SecurityContextConstraints by applying them to the cluster:
$ oc create -f synology-csi-scc.yml
Deploy the CSI provisioning pods
Finally we will apply the manifest files to deploy the Synology CSI provisioner. While it is not required, I suggest installing the optional SnapShotter files to enable the snapshot features.
$ oc create -f deploy/kubernetes/v1.20/
# If you wish to use the snapshot functions, also deploy the snapshotter
$ oc create -f deploy/kubernetes/v1.20/snapshotter/
Creating Synology Storage Classes
With the Synology CSI driver installed and properly configured we can define our storageClasses. We will create a storageClass for both NFS and iSCSI.
NFS
Create a file with the following contents, making sure to update the parameters.dsm field with the IP address of your Synology server. Also note that we will be using NFSv4.1, this protocol version is preferred over NVSv3 due to its improved file locking mechanisms. If you are not able to support NFSv4, be sure to remove the mountOptions section before applying to your cluster.
 1apiVersion: storage.k8s.io/v1
 2kind: StorageClass
 3metadata:
 4  name: synology-nfs-storage
 5provisioner: csi.san.synology.com
 6parameters:
 7  protocol: "nfs"
 8  dsm: '172.16.15.6'
 9  location: '/volume1'
10  mountPermissions: '0775'
11mountOptions:
12  - nfsvers=4.1
13reclaimPolicy: Delete
14allowVolumeExpansion: true
Apply the file to your cluster:
$ oc create -f synology-nfs-storageclass.yml
iSCSI
Create a file with the contents below, and then apply to your cluster to create a storageClass that provisions iSCSI LUNS.
 1apiVersion: storage.k8s.io/v1
 2kind: StorageClass
 3metadata:
 4  name: synology-iscsi-storage
 5provisioner: csi.san.synology.com
 6parameters:
 7  dsm: '172.16.20.13'
 8  location: '/volume1'
 9  csi.storage.k8s.io/fstype: 'ext4'
10reclaimPolicy: Delete
11allowVolumeExpansion: true
NOTE: The
csi.storage.k8s.io/fstypesets the filesystem of the PV that is created, and is not related to the filesystem that is used by your Synology.
Apply the file to your cluster:
$ oc create -f synology-iscsi-storageclass.yml
Setting the default storage class
With our storageClasses created, we need to tell OpenShift which storageClass it should use, if we don’t explicitly request a storageClass in our PVCs. I tend to prefer the iSCSI storageClass as my default, however your needs may vary. Use the command below to set the default storageClass, and be sure to update the storageClass as appropriate.
$ oc annotate storageclass synology-iscsi-storage storageclass.kubernetes.io/is-default-class=true
storageclass.storage.k8s.io/synology-iscsi-storage annotated
Creating your first PV
With the Synology CSI driver installed we can now go ahead and create a Persistent Volume. We will create this persistent volume in a new namespace to make cleanup easier.
$ oc new-project pvctest
Create a new file called my-file-storage-claim.yml with the following in it.
 1---
 2kind: PersistentVolumeClaim
 3apiVersion: v1
 4metadata:
 5  name: my-file-storage-claim
 6  namespace: pvctest
 7spec:
 8  accessModes:
 9    - ReadWriteOnce
10  resources:
11    requests:
12      storage: 2Gi
13  storageClassName: synology-iscsi-storage
14  volumeMode: Filesystem
Apply the file to your cluster to create a new PV:
$ oc create -f my-file-storage-claim.yml
persistentvolumeclaim/my-file-storage-claim created
We can check the status of the newly created PV by running the following command:
$ oc get pvc
NAME STATUS VOLUME CAPACITY ACCESS MODES STORAGECLASS AGE
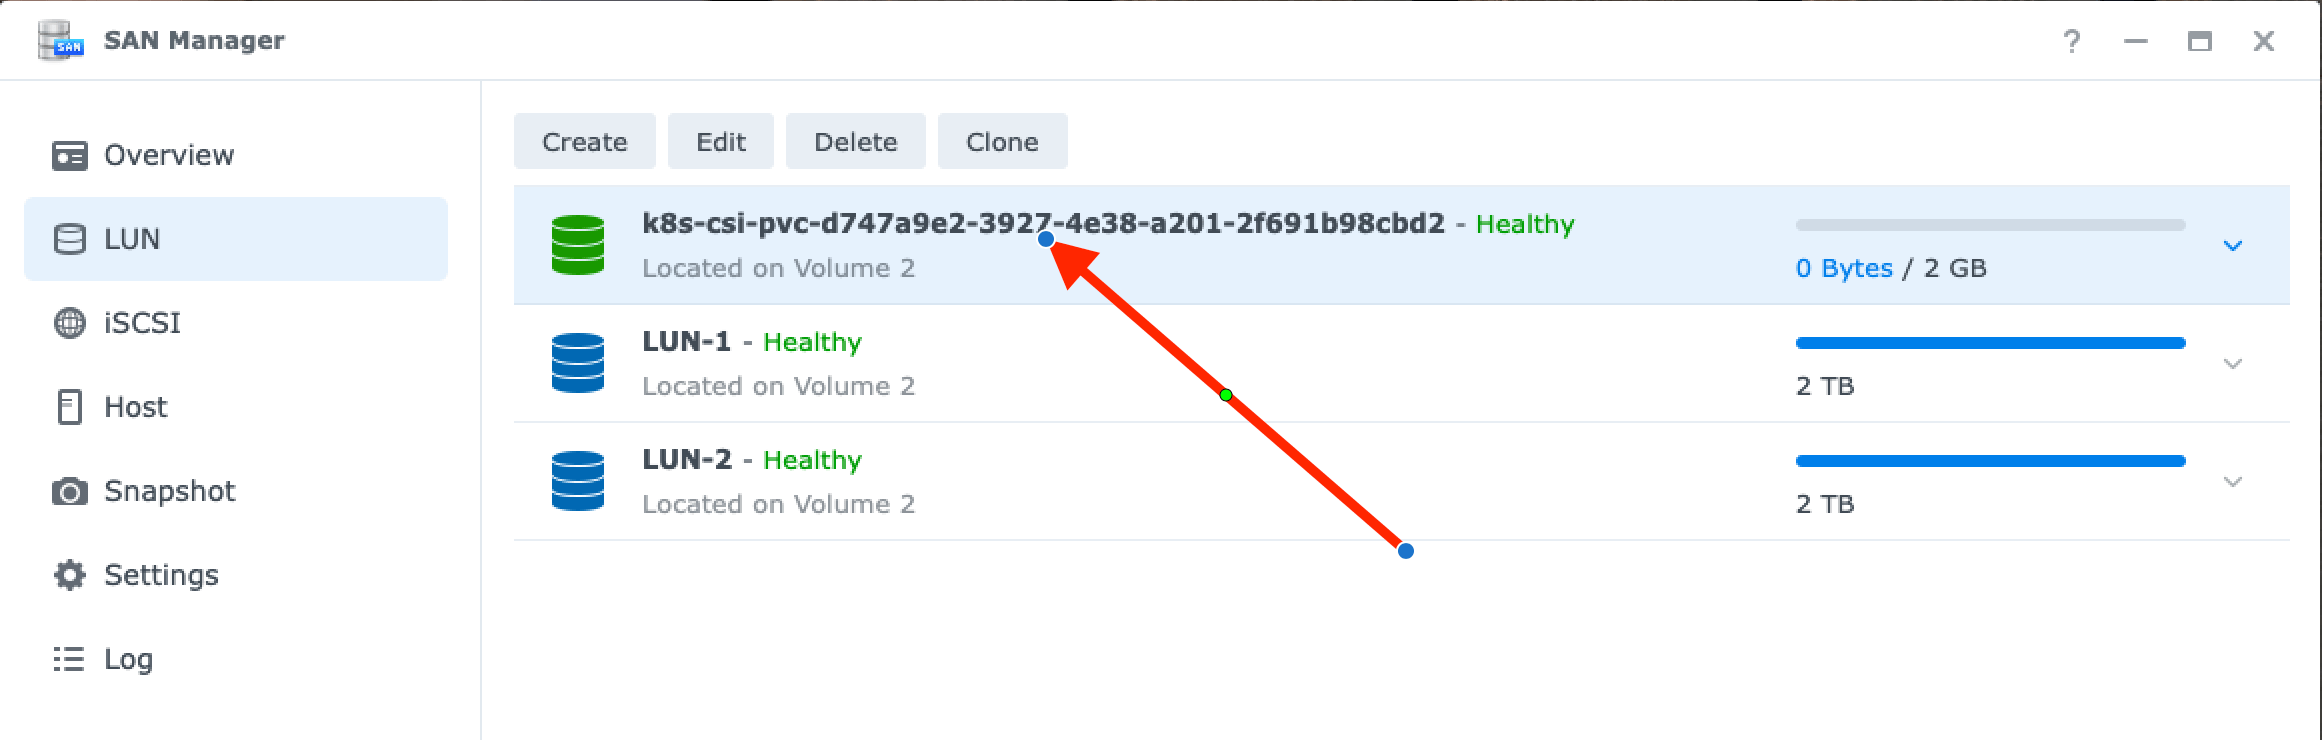
my-file-storage-claim Bound pvc-d747a9e2-3927-4e38-a201-2f691b98cbd2 2Gi RWO synology-iscsi-storage 19s
Look for the STATUS to be “Bound” to know that the new iSCSI volume was created. We can also see this in the Synology UI. Note that the VOLUME name from the oc get pvc command matches the name of the LUN in the Synology UI with “k8s-csi” prepended to the name:
Testing our PVC
In order to test out the newly created Persistent Volume, we will create a Kubernetes job that runs the Unix command dd against the persistent volume. We will use a Red Hat UBI base image to run the command in. Create a file called test-write-job.yml with the following contents:
 1---
 2apiVersion: batch/v1
 3kind: Job
 4metadata:
 5  name: write
 6spec:
 7  template:
 8    metadata:
 9      name: write
10    spec:
11      containers:
12      - name: write
13        image: registry.access.redhat.com/ubi8/ubi-minimal:latest
14        command: ["dd","if=/dev/zero","of=/mnt/pv/test.img","bs=1G","count=1","oflag=dsync"]
15        volumeMounts:
16        - mountPath: "/mnt/pv"
17          name: test-volume
18      volumes:
19      - name: test-volume
20        persistentVolumeClaim:
21          claimName: my-file-storage-claim
22      restartPolicy: Never
Apply the above Yaml to your cluster and then validate that the job was created:
$ oc create -f test-write-job.yml
$ oc get jobs
job.batch/write created
$ oc get jobs
NAME    COMPLETIONS   DURATION   AGE
write   0/1           1s         1s
Using the oc get jobs command wait until the COMPLETIONS shows 1/1 before continuing. This signifies that the job has completed. With the job complete we can now review the logs generated by our test job by running oc logs job/write:
$ oc logs job/write
1+0 records in
1+0 records out
1073741824 bytes (1.1 GB, 1.0 GiB) copied, 13.013 s, 82.5 MB/s
Cleanup PVC Test
With our new Synology CSI driver tested, we can clean up our test job, PVC and project using the following commands:
$ oc delete job/write
job.batch "write" deleted
$ oc delete pvc/my-file-storage-claim
$ oc delete project pvctest
Using the Synology CSI Driver with OpenShift Virtualization/Kubevirt
Create Storage Profile
One of the primary places that I use the Synology CSI driver is with OpenShift Virtualization/Kubevirt. In order for Kubevirt (and more specifically the containerized-data-importer - CDI ) to be able to create virtual machine images in the most optimized way, a StorageProfile needs to exist for each storage-class you wish to use with Kubevirt. The current released version of CDI does not recognize the Synology CSI driver, but we can fix this by updating the storage profile with the missing data needed. Create two files, one for iSCSI and one for NFS, using the following data.
for iSCSI
 1apiVersion: cdi.kubevirt.io/v1beta1
 2kind: StorageProfile
 3metadata:
 4  name: synology-iscsi-storage
 5spec:
 6  claimPropertySets:
 7  - accessModes:
 8    - ReadWriteMany
 9    volumeMode:
10      Block
11  - accessModes:
12    - ReadWriteOnce
13    volumeMode:
14      Block
15  - accessModes:
16    - ReadWriteOnce
17    volumeMode:
18      Filesystem
19  cloneStrategy: csi-clone
20  dataImportCronSourceFormat: pvc
for NFS
 1apiVersion: cdi.kubevirt.io/v1beta1
 2kind: StorageProfile
 3metadata:
 4  name: synology-nfs-storage
 5spec:
 6  claimPropertySets:
 7  - accessModes:
 8    - ReadWriteMany
 9    volumeMode:
10      Filesystem
11  - accessModes:
12    - ReadWriteOnce
13    volumeMode:
14      Filesystem
15  cloneStrategy: csi-clone
16  dataImportCronSourceFormat: pvc
Now, apply the files to your cluster with the oc command
$ oc apply -f synology-iscsi-storageprofile.yml
$ oc apply -f synology-nfs-storageprofile.yml
Not only will this now take advantage of the advanced features that the Synology offers (such as cloning and snapshots), but it will also clear up error and alerts in your cluster that look like the following:
no accessMode specified in StorageProfile synology-nfs-storagespec is missing accessMode and volumeMode, cannot get access mode from StorageProfile synology-nfs-storage- CDIDefaultStorageClassDegraded
- CDIStorageProfilesIncomplete
NOTE: If you have stumbled across this blog post due to any of the above errors, you will need to update the storageProfile for your specific storageClass. You can use the storageProfiles listed above as a template for what needs to be in your cluster, but I suggest contacting your storage vendor to ensure that the proper settings are applied.
Why use the array hardware assisted cloning? The time savings (especially if working with large VMs can be quite impressive). Below is an example of the time to create a new VM from an existing gold image/template:
- It takes 3 minutes 31 seconds to use a traditional copy process to create a new PVC for a VirtualMachine with a 20GB source image
- It takes less than 5 seconds to create a new PVC using the Synology driver’s hardware assisted clone.
This is a significant time savings, and can really make a big difference if you are creating multiple virtual machines at once.
Setting the kubevirt default storage profile
It is possible to use a different default storage class for virtual machines managed by Kubevirt than the default class used by OpenShift. This can be achieved by applying the annotation storageclass.kubevirt.io/is-default-virt-class=true to the appropriate storageProfile. Using the oc annotate command as shown below will add the annotation to the synology-iscsi-storage storageProfile and Kubevirt will default to this storageClass when selecting storage for use by virtual machines.
$ oc annotate storageprofile synology-iscsi-storage storageclass.kubevirt.io/is-default-virt-class=true
storageprofile.cdi.kubevirt.io/synology-iscsi-storage annotated
Conclusion
Much has changed since I first published an article on using the Synology CSI driver with OpenShift, however most of what was originally documented still works. In this article, we covered some of the enhancements as well as dove into the proper storageProfiles necessary to allow Kubevirt/OpenShift Virtualization to properly use the storage. If you are a user of OpenShift Virtualization/Kubevirt you will find that these changes make a big improvement in the performance of the creation and management of virtual machines in your cluster.