Introduction
In a my previous article OpenShift Virtualization and the Kubernetes Descheduler, I discussed the Kubernetes Descheduler and how it can be used to help manage over-committed resources in OpenShift Virtualization. One of the big concerns in that post was that while the Descheduler could move VMs from node to node to help with resource imbalances, it only looked at Kubernetes requests and Node limits when making these moves. For users migrating from vSphere to OpenShift Virtualization, this did not really give parity to features like vSPhere DRS. In this article, we will take a second look at the Kubernetes Descheduler for OpenShift Virtualization and the new features that are available. Specifically we are going to look at the Tech Preview feature called “DevKubeVirtRelieveAndMigrate” Descheduler.
One of the big disadvantages of the Kubernetes Descheduler was that it did NOT look at current CPU usage and balance out the overall workload across nodes taking into account the CURRENT usage of the system. In fairness, this is because Kubernetes was not originally intended to handle the unique requirements of virtual machines, and persistent workloads. The great thing about Kubernetes is that it can be modified and updated to evolve with the times. The engineers at Red Hat have been working to address this issue and have come up with a new Descheduler profile called “DevKubeVirtRelieveAndMigrate” which is designed to help address this use case.
DevKubeVirtRelieveAndMigrate is a real mouthful for the name, but in a nut shell here is what it is doing:
This profile makes dynamic VM de-scheduling decisions based on both CPU utilization and PSI (Pressure Stall Information) CPU metric which quantifies the disruptions of workloads due to CPU contention, often caused by excessive overcommit. At first, Descheduler will balance workloads by evicting VMs from overutilized nodes (those exceeding the cluster average CPU utilization by 10% or more) to underutilized nodes (those below the cluster average). However, when cluster-wide CPU utilization reaches 80% threshold, Descheduler shifts from using CPU utilization to PSI CPU metrics. This allows Descheduler to make smarter decisions, moving VMs from high-pressure nodes to lower pressure ones.
This descheduler profile is currently in Tech Preview which means that there is no production level support from Red Hat for this feature, but that doesn’t mean we cant take this new feature for a spin and see how it works.
Prerequisites
As with most of my blog posts, you will need an up to date version of OpenShift running in your lab. The full list of requirements is below:
- OpenShift 4 cluster - tested with OCP 4.19.4
- OpenShift Virtualization installed and configured - tested with OCP-V 4.19.1
- Administrator level privileges in the cluster
- The OpenShift oc command-line tool
- Storage that supports RWX so that VMs can migrate seamlessly between nodes
Installing the Kubernetes Descheduler Operator from OperatorHub
We will start by installing the Kube Descheduler Operator. The Descheduler is responsible for finding pods that meet certain pre-defined requirements and “de-scheduling” or evicting them, so that they will be rescheduled by the Kubernetes scheduler on another node. In order to install the operator, we must first create a namespace for the operator to be installed in:
- Log in to the OpenShift Container Platform web console.
- Navigate to Administration → Namespaces and click Create Namespace.
- Enter
openshift-kube-descheduler-operatorin the Name field - Enter
openshift.io/cluster-monitoring=truein the Labels field to enable descheduler metrics - Click Create.
Install the Kubernetes Descheduler Operator.
With the Namespace created, we can now go and install the operator.
- Navigate to Operators → OperatorHub.
- Type
Kube Descheduler Operatorinto the filter box. - Select the Kube Descheduler Operator and click Install.
- On the Install Operator page
- select A specific namespace on the cluster
- Select
openshift-kube-descheduler-operatorfrom the drop-down menu.
- Adjust the values for the Update Channel and Approval Strategy to the desired values.
- Click Install.
Wait for the Operator to install before proceeding to the next section.
Enable PSI Metrics
The new DevKubeVirtRelieveAndMigrate profile makes use of PSI to identify nodes that are overloaded. To collect this information, we need to enable the PSI counters in the Linux Kernel. In order to do this, we will turn to OpenShift MachineConfigs and enable the additional kernel argument on all of our worker nodes. Create a YAML file as outlined below and apply to your cluster with oc create -f 99-openshift-machineconfig-worker-psi-karg.yml
apiVersion: machineconfiguration.openshift.io/v1
kind: MachineConfig
metadata:
  labels:
    machineconfiguration.openshift.io/role: worker
  name: 99-openshift-machineconfig-worker-psi-karg
spec:
  kernelArguments:
    - psi=1
You can monitor the rollout of this change to your worker nodes using the oc get mcp worker and wait until “UPDATED” shows True before continuing.
NOTE: If you are using a compact cluster, you will need to change the role label above to “master” and update the name to reflect that it is applying to the master and not worker nodes.
Configuring the Kubernetes Descheduler
We are going to configure the Kubernetes Descheduler as shown below:
apiVersion: operator.openshift.io/v1
kind: KubeDescheduler
metadata:
  name: cluster
  namespace: openshift-kube-descheduler-operator
spec:
  managementState: Managed
  deschedulingIntervalSeconds: 30
  mode: "Automatic"
  profiles:
    - DevKubeVirtRelieveAndMigrate
  profileCustomizations:
    devEnableSoftTainter: true
    devDeviationThresholds: AsymmetricLow
    devActualUtilizationProfile: PrometheusCPUCombined
By setting the profile to DevKubeVirtRelieveAndMigrate the KubeDescheduler will use CPU usage metrics as well as PSI to find nodes that are overutilized, and will attempt to migrate workloads off these nodes in order to relieve the over-utilization. In the configuration above, we have set the descheduler to run every 30 seconds, and move/reschedule pods based on node usage. For production use, this is very aggressive but for demonstration purposes this will work well, as we can see VMs balanced out quickly in our cluster. In a production environment, I would look more and having this run every 10-15 minutes, so as not to cause unneeded thrashing of the VMs from host to host. Your specific needs may vary, so you can tune this as you see fit, just ensure that you are not creating a thrashing scenario where VMs are migrating too often.
Testing out the new profile
In order to test this out, we are going to create a large workload on our cluster, and then let the new DevKubeVirtRelieveAndMigrate profile balance out the workload across all the available nodes. We will leverage a feature of Kubevirt the VirtualMachinePool to quickly create multiple copies of a VM to create our workload. The VirtualMachinePool is similar to a Kubernetes ReplicaSet, in that you can create a definition of a VM and then scale it up and down by defining the number of replicas that you require.
In order to make the demo have more impact, I suggest marking one or more nodes in your cluster as “unschedulable”. This will ensure that instead of waiting for node resource usage to change to allow for the balancing to occur, we can trigger a change that will allow additional resources to be made available and the DevKubeVirtRelieveAndMigrate descheduler can migrate workloads. We will “fill” the cluster with a high workload, and then once fully loaded, mark the node as scheduleable which will trigger a rebalancing of the workloads. To mark a node as not scheduleable run the following command:
oc adm cordon <node name>
You can also navigate to “Compute->Nodes”, find the node you want to de-schedule and select the “three dots” followed by “Mark as Unschedulable”

Creating CPU Workload
In order to push the resource utilization on the nodes we will create multiple Fedora Virtual Machines, which each run the stress-ng tool, creating a high CPU workload that the Kubernetes Descheduler can respond to. The definition below will create three Virtual Machines, all running a Fedora OS, with the stress-ng application installed.
apiVersion: pool.kubevirt.io/v1alpha1
kind: VirtualMachinePool
metadata:
  name: vm-pool-fedora
spec:
  replicas: 3
  selector:
    matchLabels:
      kubevirt.io/vmpool: vm-pool-fedora
  virtualMachineTemplate:
    metadata:
      creationTimestamp: null
      labels:
        kubevirt.io/vmpool: vm-pool-fedora
      annotations:
        descheduler.alpha.kubernetes.io/evict: "true"
    spec:
      runStrategy: Always
      template:
        metadata:
          creationTimestamp: null
          labels:
            kubevirt.io/vmpool: vm-pool-fedora
        spec:
          domain:
            cpu:
              cores: 1
              maxSockets: 4
              model: host-model
              sockets: 1
              threads: 1
            devices:
              disks:
              - disk:
                  bus: virtio
                name: containerdisk
              - disk:
                  bus: virtio
                name: cloudinitdisk
            memory:
              guest: 2048Mi
          terminationGracePeriodSeconds: 0
          volumes:
          - containerDisk:
              image: quay.io/kubevirt/fedora-cloud-container-disk-demo
            name: containerdisk
          - cloudInitNoCloud:
              userData: |
                #cloud-config
                user: fedora
                password: fedora
                chpasswd: { expire: False }
                ssh_pwauth: True
                disable_root: false
                package_update: true
                packages:
                  - stress-ng
                runcmd:
                  - stress-ng --matrix 0
            name: cloudinitdisk
One thing before we proceed. Note the line that is highlighted above. If you have not annotated your VMs with descheduler.alpha.kubernetes.io/evict: "true" the vms will NOT targeted for rebalancing. This is basically an “Opt-In” feature. If you find that your VM workloads are not being appropriately balanced across your cluster, be sure to validate that they are annotated such that they can be migrated.
We will start out with 3 VM replicas, and then, you can scale it up to fill your cluster. To scale the vms up run the following command oc scale vmpool vm-pool-fedora --replicas 3 replacing the number “3” with however many VMs you want to run. To make this test run quickly, I suggest scaling the VMs up until no more can be scheduled. Let the VMs run for a few minutes to ensure that the stress-ng app is running and consuming CPU cycles in all of the VMs.
$ oc scale vmpool vm-pool-fedora --replicas 10
virtualmachinepool.pool.kubevirt.io/vm-pool-fedora scaled
$ oc get virtualmachinepool
NAME             DESIRED   CURRENT   READY   AGE
vm-pool-fedora   10        10        7       27d
NOTE: For the purposes of this demo, scale the number of replicas up until no additional VMs become “READY”, this way you have maxed out your current resources.
We can use the OpenShift “Observe” feature to see that we are creating a substantial CPU load on our cluster.
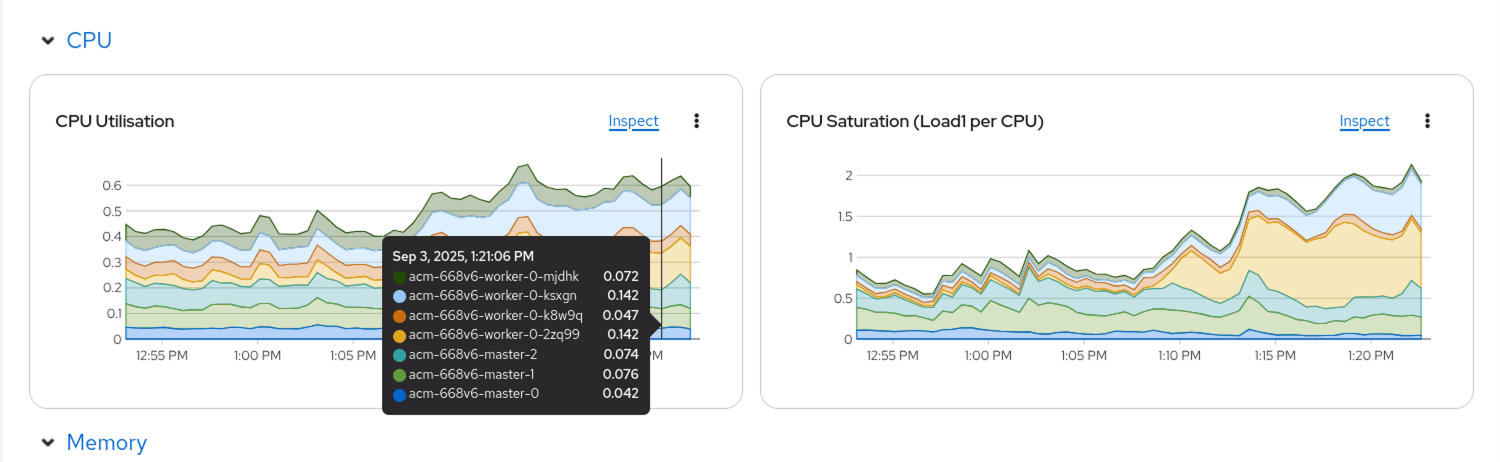
Note the spike in CPU load starting about 1:14pm in the image. This is the VMs scaling up and running, creating a large load on the underlying bare-metal infrastructure. You can see that the majority of the workloads are running on two nodes (as indicated by the blue and orange color…)
We can check to see on which nodes the VMs are running using the oc get vmi command:
$ oc get vmi
NAME                AGE   PHASE     IP             NODENAME                   READY
vm-pool-fedora-0    48m   Running   10.128.2.167   acm-668v6-worker-0-mjdhk   True
vm-pool-fedora-17   48m   Running   10.131.3.25    acm-668v6-worker-0-mjdhk   True
vm-pool-fedora-26   48m   Running   10.130.2.156   acm-668v6-worker-0-bf876   True
vm-pool-fedora-4    48m   Running   10.130.2.157   acm-668v6-worker-0-bf876   True
vm-pool-fedora-44   33m   Running   10.131.3.23    acm-668v6-worker-0-mjdhk   True
vm-pool-fedora-8    33m   Running   10.128.2.163   acm-668v6-worker-0-k8w9q   True
vm-pool-fedora-9    33m   Running   10.131.3.24    acm-668v6-worker-0-mjdhk   True
Now our test environment is all set up. We can uncordon one of our worker node(s) so that we can see the VMs start to move based on the overall workload in the cluster. Use the command oc adm uncordon <node name> or fine the node in the UI and select the “three dots” followed by “Mark as Scheduleable”.
With the additional node and CPU resources now being made available, we can see that our virtual machines will start to be Migrated to the new node automatically. This can be seen in the UI as shown below:
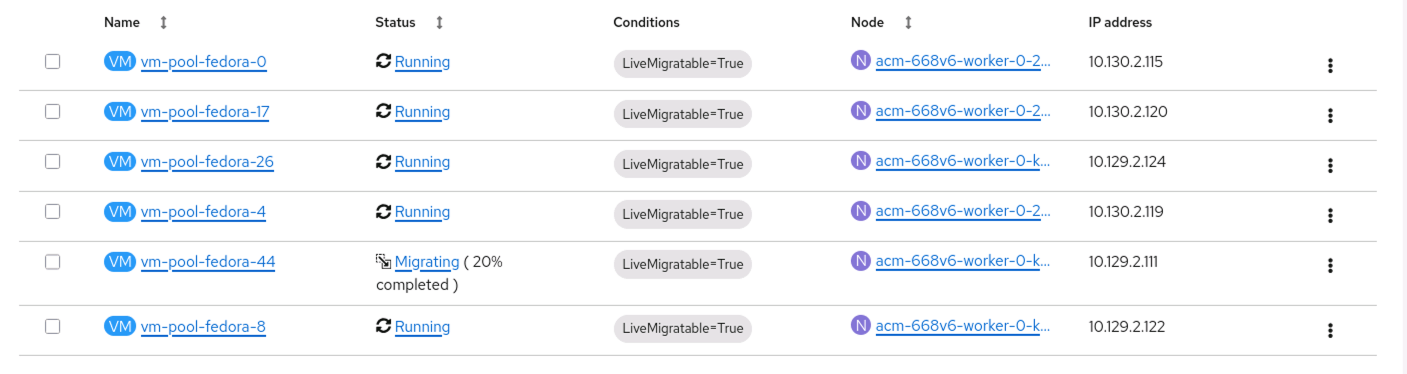
and we can also see this from the command line:
$ oc get vmi
NAME                AGE   PHASE       IP             NODENAME                   READY
vm-pool-fedora-0    50m   Running     10.131.3.27    acm-668v6-worker-0-mjdhk   True
vm-pool-fedora-17   50m   Running     10.131.3.25    acm-668v6-worker-0-mjdhk   True
vm-pool-fedora-26   50m   Running     10.130.2.156   acm-668v6-worker-0-bf876   True
vm-pool-fedora-4    50m   Running     10.130.2.157   acm-668v6-worker-0-bf876   True
vm-pool-fedora-44   35m   Migrating   10.131.3.23    acm-668v6-worker-0-k8w9q   True
vm-pool-fedora-8    35m   Running     10.128.2.163   acm-668v6-worker-0-k8w9q   True
vm-pool-fedora-9    35m   Running     10.131.3.24    acm-668v6-worker-0-bf876   True
Review the output above, you will notice that vm-pool-fedora-44 and vm-pool-fedora-9 have moved nodes in order to better balance out the CPU resources being used in this cluster.
Reviewing System Usage after Balancing
We have already validated that we can see the VMs deployed and consuming CPU resources and that the nodes are under high utilization. We can now go back and review the same graphs to see how the workload has been balanced out across the cluster and our nodes.
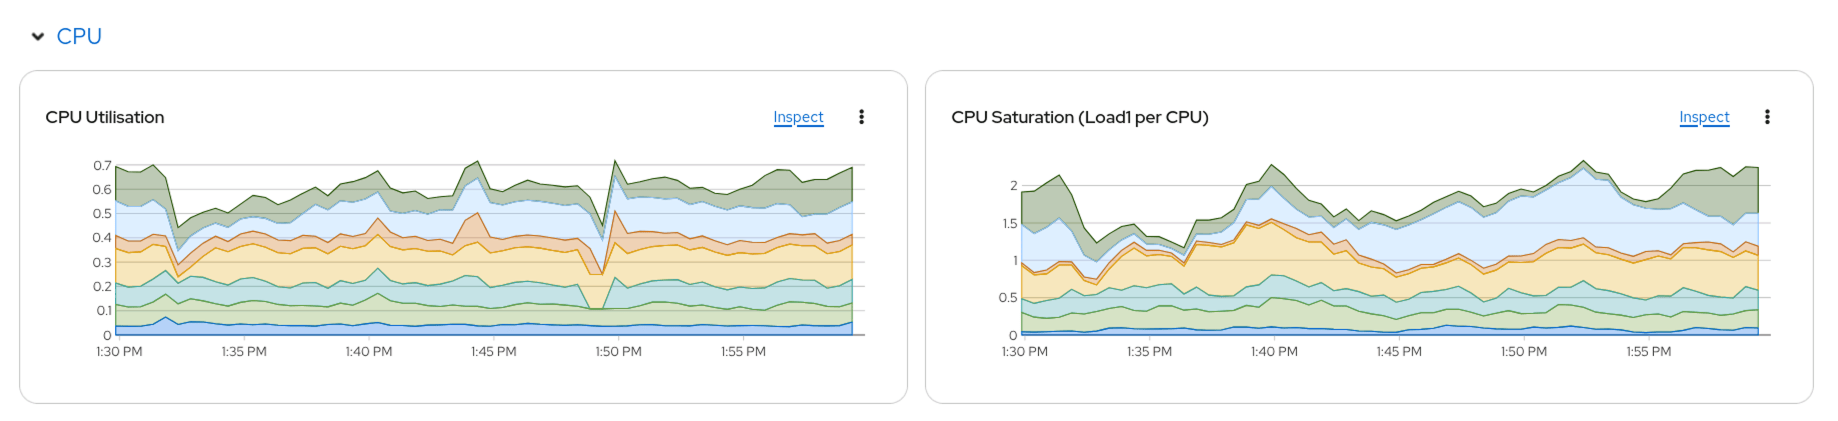
Looking at the “CPU Saturation” graph around the 1:55 PM timeframe you will see that the saturation for the “green” node and “blue” node balance out and that the overall saturation of the “blue”, “green” and “orange” nodes are relatively the same. You should not expect to see the loads balanced perfectly, as VM workloads are constantly changing and you do not want to have VMs getting into a migration storm, moving from one node to the other constantly, but you should see a much more balanced workload than in the past.
Conclusion and Whats Next
In this post we have taken a look at one of the new features/improvements that are coming to OpenShift Virtualization. This new feature brings additional parity between OpenShift Virtualization and vSphere. Looking at the upstream project there are multiple Prometheus profiles that are available for use depending on your needs. This includes various uses of PSI and CPU usage as well as a profile that takes IO utilization into account. Note that these are upstream options and may not have long term support from Red Hat.
Reference:
Dynamic VM CPU Workload Rebalancing with Load Aware Descheduler