With interest in OpenShift and more specifically OpenShift Virtualization taking off, users who do not typically use Linux have a need for a Linux workstation in-order to deploy OpenShift. While the oc command used to manage OpenShift does work on Windows other utilities such as the openshift-install command used to deploy OpenShift clusters does not. So whats a Windows using future OpenShift administrator supposed to do?
Well, you have a few options:
- Obtain some hardware and install a Linux distribution on that hardware. This means learning Linux, and a new UI and workflow.
- Install a full Linux distribution on your Windows workstation using something like VMware Workstation, or VirtualBox. Again you will need to learn Linux.
- Use Podman and a podman container. This will be the topic of a future blog post.
- Use Windows Subsystem for Linux (WSL). WSL is available in Windows 10 and Windows 11, and allows you to run a small Linux distribution on your Workstation, which we can then run the
openshift-installcommands from.
Given that you are here reading this blog post, you have probably figured out that we will be discussing using WSL. There are two versions of WSL, and we will be leveraging WSL2. If you want to know more about the differences see Comparing WSL Versions.
NOTE: WSL 2 is only available in Windows 11 or Windows 10, Version 1903, Build 18362 or later. Check your Windows version by selecting the Windows logo key + R, type winver, select OK.
While you can follow many blog posts out there for installing and using WSL2, they will mostly install Ubuntu or Debian based distributions. In order to run certain OpenShift install processes you need additional software that is available in Fedora based distributions such as Fedora, CentOS Stream, SLES, etc. We will install Fedora which will work well for the openshift-install application.
Prerequisites
You will need either a Windows 10 or Windows 11 workstation. If you are using Windows 10, you will also need a copy of 7zip installed to extract some files later in this process.
Obtaining Fedora Base Image
In order to install Fedora in WSL2, we will download the Fedora 39 Base image from the Fedora Build System by clicking on this link: Koji.
NOTE: This is the latest Fedora distribution available at the time of publication, if you come across this post a year from now, you may want to look for a newer base image.
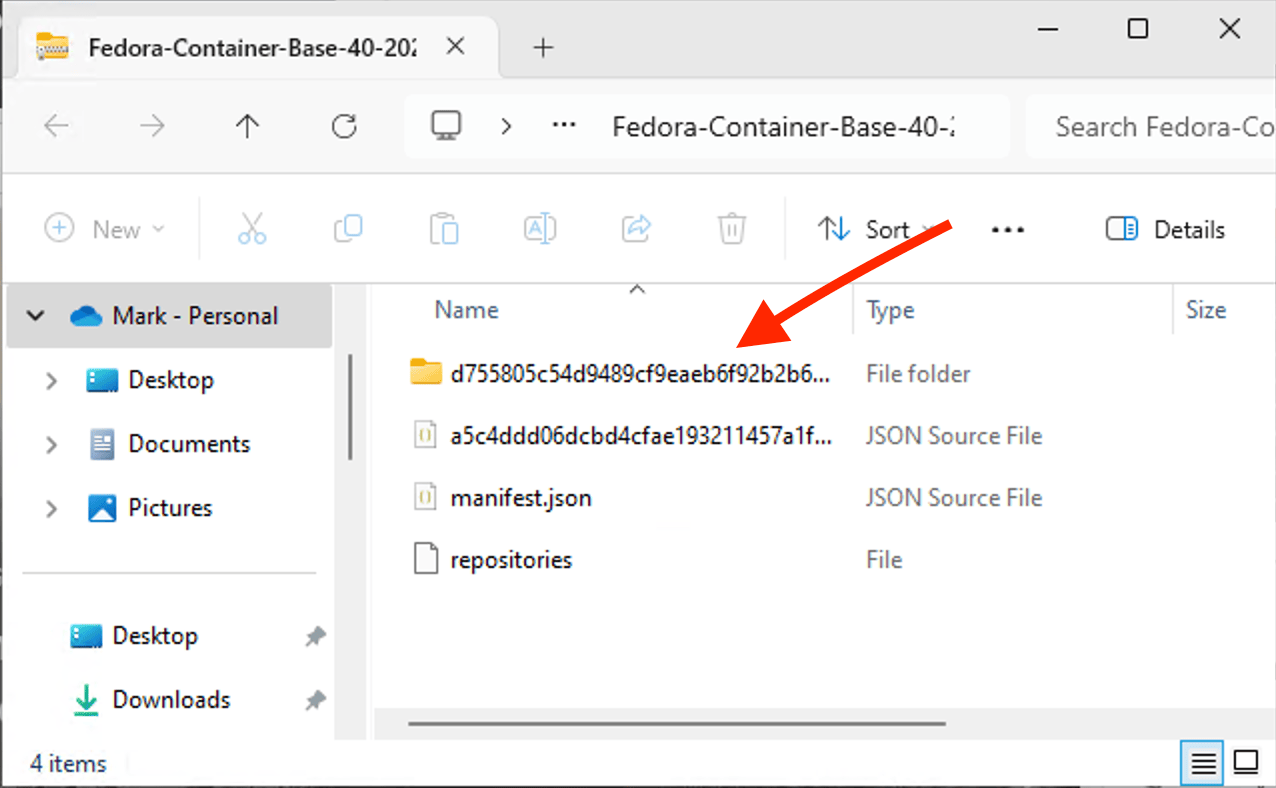
If you are using Windows 11, double-click on the file you just downloaded. If you are using Windows 10, open the file with 7zip.
The file is like a zipfile, and you will see the contents of the file. Select the folder that is embedded in the file. (in the image below its the folder that starts with the name d7558)
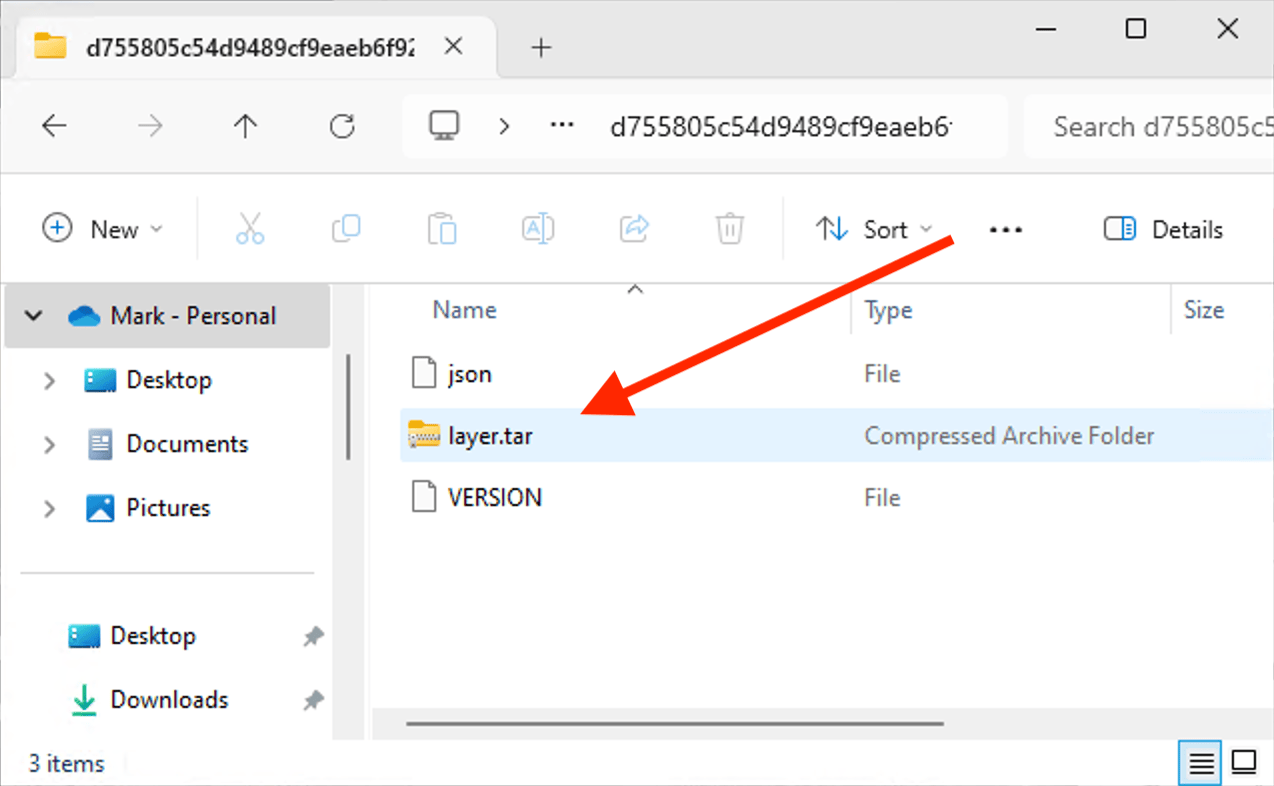
We need to extract the layer.tar file and put it in your Downloads directory.
Your Downloads directory should now have a file called layer.tar in it.
Install WSL2
We will now install WSL2 on your machine. Open a PowerShell terminal and run the commands shown below:
PS > wsl --install --no-distribution
# you will be prompted for elevated permissions, accept to continue
Installing: Virtual Machine Platform
Virtual Machine Platform has been installed.
Installing: Windows Subsystem for Linux
Windows Subsystem for Linux has been installed.
The requested operation is successful. Changes will not be effective until the system is rebooted.
PS > wsl --set-default-version 2
For information on key differences with WSL 2 please visit https://aka.ms/wsl2
The operation completed successfully.
At this point you will need to reboot your PC in order for WSL to complete the install.
Import Fedora
With your machine rebooted, we will install the Fedora base (or root filesystem). Open a PowerShell terminal and run the following commands.
PS > mkdir $HOME\wsl\fedora
PS > wsl --import fedora $HOME\wsl\fedora $HOME\Downloads\layer.tar
Import in progress, this may take a few minutes.
The operation completed successfully.
We can now start our WSL Fedora instance.
PS > wsl -d fedora
[root@win11wk1 markd]#
Congrats, you now have a working instance of Fedora on your Windows workstation. We will now do a little bit of customization.
Customization
We need to update, install some base packages and then add a user. Start by running the command dnf update -y && dnf install -y util-linux passwd cracklib-dicts nmstate which will update the installed software, and install some additional packages. This will take a few minutes to complete, as it must download numerous update files.
PS > wsl -d fedora
# dnf update -y && dnf install -y util-linux passwd cracklib-dicts
<output omitted>
...
Complete!
#
By default, the install will run as root. This is not a good idea, so we will create a user account, and configure WSL to start by default with this new user. In the example commands below we will create a user named “markd”, you can create any username you would like.
# useradd -m -G wheel markd
# passwd markd
Changing password for user markd.
New password:
Retype new password:
passwd: all authentication tokens updated successfully.
To ensure that each time we start a WSL instance, we are logged in as this new user we need to update the /etc/wsl.conf file with the username we want to be logged in as. While still connected as root run the following command:
# cat << EOF  > /etc/wsl.conf
[user]
default = markd
EOF
# exit
In order to use this new account, we need to shut down WSL and start it back up.
PS> wsl --shutdown
PS> wsl
You now have a working Fedora install on your windows machine.
Installing the OpenShift Utilities
Lets get the files for openshift now
$ cd ~
$ mkdir ~/bin && mkdir ~/Downloads
$ curl https://mirror.openshift.com/pub/openshift-v4/x86_64/clients/ocp/stable-4.15/openshift-client-linux.tar.gz -o ~/Downloads/openshift-client-linux.tar.gz
$ curl https://mirror.openshift.com/pub/openshift-v4/x86_64/clients/ocp/stable-4.15/openshift-install-linux.tar.gz -o ~/Downloads/openshift-install-linux.tar.gz
$ cd ~/bin
$ tar -zxvf ~/Downloads/openshift-client-linux.tar.gz
$ tar -zxvf ~/Downloads/openshift-install-linux.tar.gz
You should now be able to run the oc and openshift-install commands from your Windows machine using the WSL instance you just installed. At this point you can now follow the install instructions for your particular platform at OpenShift Container Platform installation overview. Just make sure you run all commands from your WSL instance.
Passing files between WSL and Windows
One additional note. When you are working with the openshift-install command you may need to create or edit files. By default, your Windows User home directory is available at /mnt/c/Users/markd/ in your WSL instance. This means you can create a folder in your Windows home directory, create all files needed with your favorite Windows editor, and then access them from within your WSL instance.
NOTE: If you are a Visual Studio Code user, be sure to check out the WSL Extension. This extension makes it SUPER easy to edit files within your WSL environment.
Conclusion
If you are a Windows user, but want to install OpenShift there are options for you that do not require installing a full Linux workstation. By leveraging WSL we are able to create a minimal Fedora Linux image, giving us just what we need to run the openshift-install command. In a future blog post we will discuss using Podman and containers to install OpenShift from your Windows machine.

