When reviewing OpenShift Virtualization as an alternative for VMware vSphere, you will undoubtedly want to compare features. One of the primary features that vSphere has that many enterprise deployments rely on is the Distributed Resource Scheduler, or DRS. What is DRS? DRS is a feature of vSphere that helps to balance the overall workload of a cluster across all servers in a given vSphere cluster. vSphere achieves this by monitoring the current virtual machine usage as compared to the host it is running on and all other hosts in the cluster and moving heavily used VMs to hosts that are underused (and vice-versa). In addition HA or High Availability is usually enabled with DRS, in order to ensure that if a host running VMs fails, the VMs are scheduled onto another working node.
Resource Scheduling and High Availability are two separate features of OpenShift Virtualization, and we will not be discussing the HA feature in this blog. If you are looking to enable HA in your OpenShift cluster I suggest reading about Node remediation, fencing, and maintenance or see my previous blog post OpenShift Machine Remediation for additional details on enabling High Availability in your OpenShift Virtualization cluster.
Since OpenShift Virtualization is based on Kubernetes and Kubernetes concepts, we will look to a Kubernetes solution to handle the re-balancing of virtual machines in our cluster. In this case, the Kubernetes solution is the “Kubernetes Descheduler”.
What is the Kubernetes Descheduler
The Kubernetes Descheduler is a controller that watches the resource usage of the nodes in a cluster, and when it finds pods that are running on a node that is overutilized, it will “deschedule” it on its current node, and it will be re-scheduled onto another more appropriate node by the Kubernetes Scheduler.
The first thing to understand about the Kubernetes Descheduler is that the actions it takes are based on the Kubernetes “Requests/Limits” system. It does NOT look at actual (current) CPU/Memory usage. This statement bears repeating:
“The kubernetes Descheduler does not look at the real time usage of a Node, but instead works off the Requests/Limits system of Kubernetes.”
Understanding this statement is KEY to understanding how the Descheduler works, and what to expect from it. If you are not aware of Kubernetes Requests/Limits, I suggest reading the official docs on Kubernetes Requests and Limits and then a previous article on this blog on how Requests and Limits are used in OpenShift Virtualization, OpenShift Virtualization and Resource Overcommitment.
When configuring the Descheduler on OpenShift for virtual machines, we select the “LongLifecycle” profile. This profile uses the following criteria to determine what an workloads to evict:
- RemovePodsHavingTooManyRestarts: removes pods whose containers have been restarted too many times and pods where the sum of restarts over all containers (including Init Containers) is more than 100. Restarting the VM guest operating system does not increase this count.
- LowNodeUtilization: evicts pods from overutilized nodes when there are any underutilized nodes. The destination node for the evicted pod will be determined by the Kubernetes Scheduler.
- A node is considered underutilized if its usage is below 20% for all thresholds (CPU, memory, and number of pods).
- A node is considered overutilized if its usage is above 50% for any of the thresholds (CPU, memory, and number of pods)
Using these definitions, the descheduler evicts pods from overutilized nodes only when there are underutilized nodes available. The destination node for the evicted pod will be determined by the Kubernetes Scheduler.
NOTE: Evicting a VM from a node triggers a Live Migration from one node to another, so the VM is NOT shut down or powered off by the eviction.
Keep in mind, the Descheduler must find BOTH an “underutilized” node, AND a “overutilized” node, in order to trigger a descheduler event.
There is a key sentence above “destination node for the evicted pod will be determined by the Kubernetes Scheduler” … so what does this mean? The default scheduler in the OpenShift platform has the following options
LowNodeUtilization - This profile attempts to spread pods evenly across nodes to get low resource usage per node. This profile provides the default scheduler behavior.
HighNodeUtilization - This profile attempts to place as many pods as possible on to as few nodes as possible. This minimizes node count and has high resource usage per node.
NoScoring - This is a low-latency profile that strives for the quickest scheduling cycle by disabling all score plugins. This might sacrifice better scheduling decisions for faster ones.
By default, OpenShift uses the LowNodeUtilization profile. If you want to change this, review the Node Scheduler Profile page and you can choose the scheduler profile that works best for your specific needs.
Digging Deeper
So with an base understanding of the Descheduler and Requests and Limits in mind, what is the Descheduler actually doing? By default, the Descheduler runs every 60 minutes, and looks at the Allocated resources (Requests) of all nodes in the cluster, to make its decisions. So, as an example lets look at the CPU and Memory allocations for a node:
$ oc describe node/acm-775pj-worker-ph2f8
... output truncated ...
Allocated resources:
  (Total limits may be over 100 percent, i.e., overcommitted.)
  Resource                       Requests           Limits
  --------                       --------           ------
  cpu                            2891m (40%)        2887m (52%)
  memory                         15334440769 (38%)  23634085632 (98%)
So if we look at the “Requests” above this machine is only “40%” in use. It is not over-subscribed or overloaded. BUT if we took a look at the Node utilization in real-time, you would see a different story:
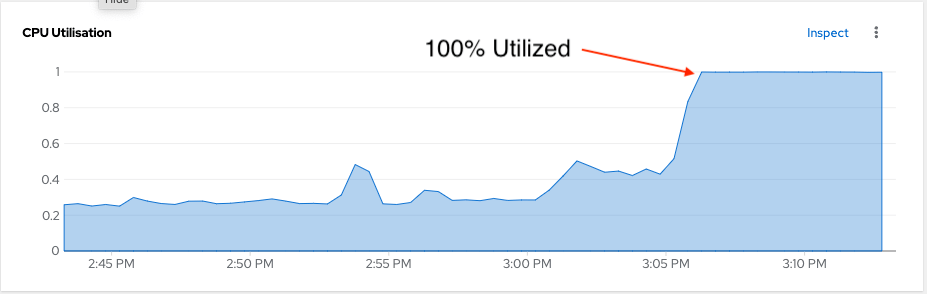
Now because the Kubernetes Descheduler is only looking at the Requests and limits on this machine (both well under 100%), the Descheduler will not trigger a VM migration, to balance this workload out. This is very different than the model used by vSphere, and requires adjusting your expectations of what this tool can do for your cluster.
REMEMBER: “The kubernetes Descheduler does not look at the real time usage of a Node, but instead works off the Requests/Limits system of Kubernetes.”
How could we be in a situation where the CPU requests for the node show 40% but the actual utilization is 100%. This is due to over-subscription, allowing the VM(s) on the node to use more resources than they requested. This is a typical scenario when it comes to the oversubscription of resources by VMs. Keep in mind, that this is NOT the type of scenario that the Descheduler will handle. (At least not yet, more about this at the end of this post.)
Lets go ahead and install and configure the Kubernetes Descheduler, so you can test this out and see how it works in your environment.
Prerequisites
- OpenShift 4 cluster - tested with OCP 4.17.10
- OpenShift Virtualization installed and configured - tested with OCP-V 4.17.3
- Administrator level privileges in the cluster
- The OpenShift oc command-line tool
- Storage that supports RWX so that VMs can migrate seamlessly between nodes
Installing the Kubernetes Descheduler Operator from OperatorHub
We will start by installing the Kube Descheduler Operator. The Kube Descheduler Operator is responsible for watching the nodes in a cluster and flagging those nodes that are failing or in a non-healthy state so that they can be isolated and remediated back to health.
- Log in to the OpenShift Container Platform web console.
- Navigate to Administration → Namespaces and click Create Namespace.
- Enter
openshift-kube-descheduler-operatorin the Name field - Enter
openshift.io/cluster-monitoring=truein the Labels field to enable descheduler metrics - Click Create.
Install the Kubernetes Descheduler Operator.
- Navigate to Operators → OperatorHub.
- Type
Kube Descheduler Operatorinto the filter box. - Select the Kube Descheduler Operator and click Install.
- On the Install Operator page
- select A specific namespace on the cluster
- Select
openshift-kube-descheduler-operatorfrom the drop-down menu.
- Adjust the values for the Update Channel and Approval Strategy to the desired values.
- Click Install.
Wait for the Operator to install before proceeding to the next section.
Configuring the Kubernetes Descheduler
- From the Operators → Installed Operators page, click the Kube Descheduler Operator.
- Select the Kube Descheduler tab and click Create KubeDescheduler.
- Edit the following settings.
- To evict pods instead of simulating the evictions, change the Mode field to Automatic.
- Expand the profileCustomizations section and check the “devEnableEvictionsInBackground” option
- Expand the Profiles section and select LongLifecycle.
- Click Create
NOTE: The only profile currently supported for OpenShift Virtualization is LongLifecycle.
Tuning the Descheduler
By default the descheduler runs once an hour (every 3600 seconds). This interval can be changed by making a change to spec.deschedulingIntervalSeconds in the Kube Descheduler Operator -> Kube Descheduler Details. By setting this lower, the cluster utilization will be re-calculated more often, keeping in mind that this may cause more VM migrations.
apiVersion: operator.openshift.io/v1
kind: KubeDescheduler
metadata:
  name: cluster
  namespace: openshift-kube-descheduler-operator
spec:
  logLevel: Normal
  mode: Automatic
  operatorLogLevel: Normal
  deschedulingIntervalSeconds: 3600
  profiles:
    - LongLifecycle
Unsupported Geek Knob
It is possible to tweak the cpu/memory/pod percentage usage with the spec.profileCustomizations.devLowNodeUtilizationThresholds:
- “Low” - 10%:30%
- “Medium” - 20%:50% - this is the default configuration
- “High” - 40%:70%
This setting is experimental and NOT officially supported at this time. We will however, use this setting below to test the Descheduler and you may have reason to change this based on your unique situation.
Enabling VM Descheduling
In order for VMs to be scheduled for eviction, they must be properly tagged. Ensure that any VMs that you want to be evicted for resource utilization balancing have the descheduler.alpha.kubernetes.io/evict: "true" annotation as shown below:
apiVersion: kubevirt.io/v1
kind: VirtualMachine
spec:
  template:
    metadata:
      annotations:
        descheduler.alpha.kubernetes.io/evict: "true"
Lets assume we want the descheduler to work on all our virtual machines. We will use the oc command to annotate all our vms with this annotation:
$ oc get vm -o name | xargs -I % oc annotate % descheduler.alpha.kubernetes.io/evict=true
This will take all vms in your current project and tag them with the descheduler annotation.
Reviewing the DeScheduler Decisions
With the Descheduler configured and VMs properly tagged for migration, lets look at the logs of the descheduler pod, and see what decisions the descheduler is making. From the command line, we will retrieve the logs from the running descheduler pod:
$ oc project openshift-kube-descheduler-operator
$ oc get pods
NAME                                    READY   STATUS    RESTARTS   AGE
descheduler-67d7dbd4c5-mtn78            1/1     Running   0          6m54s
descheduler-operator-79684d68dc-nzbjp   1/1     Running   0          15m
$ oc logs descheduler-67d7dbd4c5-mtn78
<lines excluded>
[1 toomanyrestarts.go:110] "Processing node" node="acm-775pj-master-0"
[1 toomanyrestarts.go:110] "Processing node" node="acm-775pj-master-1"
[1 toomanyrestarts.go:110] "Processing node" node="acm-775pj-master-2"
[1 toomanyrestarts.go:110] "Processing node" node="acm-775pj-worker-kjmtr"
[1 toomanyrestarts.go:110] "Processing node" node="acm-775pj-worker-ktffc"
[1 toomanyrestarts.go:110] "Processing node" node="acm-775pj-worker-l5hmt"
[1 toomanyrestarts.go:110] "Processing node" node="acm-775pj-worker-ph2f8"
[1 toomanyrestarts.go:110] "Processing node" node="acm-775pj-worker-zzbff"
[1 profile.go:323] "Total number of pods evicted" extension point="Deschedule" evictedPods=0
[1 nodeutilization.go:201] "Node is overutilized" node="acm-775pj-master-0" usage={"cpu":"3162m","memory":"10455Mi","pods":"69"} usagePercentage={"cpu":57.49090909090909,"memory":45.63251848885247,"pods":27.6}
[1 nodeutilization.go:201] "Node is overutilized" node="acm-775pj-master-1" usage={"cpu":"3274m","memory":"10655Mi","pods":"71"} usagePercentage={"cpu":59.527272727272724,"memory":46.505450454205935,"pods":28.4}
[1 nodeutilization.go:204] "Node is appropriately utilized" node="acm-775pj-master-2" usage={"cpu":"2450m","memory":"7597Mi","pods":"41"} usagePercentage={"cpu":44.54545454545455,"memory":33.15833201057953,"pods":16.4}
[1 nodeutilization.go:201] "Node is overutilized" node="acm-775pj-worker-kjmtr" usage={"cpu":"2532m","memory":"20336082945","pods":"60"} usagePercentage={"cpu":46.03636363636364,"memory":62.61229694104561,"pods":24}
[1 nodeutilization.go:201] "Node is overutilized" node="acm-775pj-worker-ktffc" usage={"cpu":"4507m","memory":"13259Mi","pods":"94"} usagePercentage={"cpu":60.093333333333334,"memory":42.80643300113186,"pods":37.6}
[1 nodeutilization.go:201] "Node is overutilized" node="acm-775pj-worker-l5hmt" usage={"cpu":"2958m","memory":"18644729857","pods":"74"} usagePercentage={"cpu":39.44,"memory":57.40562525333351,"pods":29.6}
[1 nodeutilization.go:201] "Node is overutilized" node="acm-775pj-worker-ph2f8" usage={"cpu":"2944m","memory":"9455Mi","pods":"49"} usagePercentage={"cpu":53.527272727272724,"memory":63.58117456322222,"pods":19.6}
[1 nodeutilization.go:201] "Node is overutilized" node="acm-775pj-worker-zzbff" usage={"cpu":"2195m","memory":"9041Mi","pods":"65"} usagePercentage={"cpu":39.90909090909091,"memory":60.7971865918659,"pods":26}
[1 lownodeutilization.go:134] "Criteria for a node under utilization" CPU=20 Mem=20 Pods=20
[1 lownodeutilization.go:135] "Number of underutilized nodes" totalNumber=0
[1 lownodeutilization.go:148] "Criteria for a node above target utilization" CPU=50 Mem=50 Pods=50
[1 lownodeutilization.go:149] "Number of overutilized nodes" totalNumber=7
[1 lownodeutilization.go:152] "No node is underutilized, nothing to do here, you might tune your thresholds further"
[1 profile.go:356] "Total number of pods evicted" extension point="Balance" evictedPods=0
[1 descheduler.go:170] "Number of evicted pods" totalEvicted=0
So lets review the output. Note that the criteria for an “Underutilized” node is anything under 20% utilization, and an OverUtilized node is anything over 50%.
"Node is appropriately utilized" node="acm-775pj-master-2" usage={"cpu":"2450m","memory":"7597Mi","pods":"41"} usagePercentage={"cpu":44.54545454545455,"memory":33.15833201057953,"pods":16.4}
"Node is overutilized" node="acm-775pj-worker-ktffc" usage={"cpu":"4507m","memory":"13259Mi","pods":"94"} usagePercentage={"cpu":60.093333333333334,"memory":42.80643300113186,"pods":37.6}
In the output above, you can see that node acm-775pj-worker-ktffc is overutilized, and the details that the descheduler is using to make this determination. We can also see that node acm-775pj-master-2 is “appropriately utilized”. There are no nodes that are “underutilized” so there is no place to move any of the VMs in this cluster. We can make some tweaks to these settings, by changing our Profile settings, but as previously mentioned these changes are not officially supported by Red Hat. We will take a look at making these changes in the next section.
Tuning the thresholds
If you notice in the output above, there is a message “No node is underutilized … you might tune your thresholds further”. The changes that can be made are detailed in the upstream GitHub repo documentation under Profile Customizations. In order to force the cluster descheduler to move things around, we are going to set the scheduler to be more aggressive. We will set the: devLowNodeUtilizationThresholds to “High”:
- Sets experimental thresholds for the LowNodeUtilization strategy of the LifecycleAndUtilization profile in the following ratios:
- Low for 10%:30%,
- Medium for 20%:50%,
- High for 40%:70%.
We will make the change to the Descheduler to make it more aggressive for this demo. Specifically we are going to tell it that an “under utilized node” is anything under 40% and an over-utilized node is anything over 70%. This will give us the best chances of the descheduler moving VMs around. To make this change we need to edit the KubeDescheduler instance. This can be done from the command line or from the UI.
Tuning the thresholds - UI
Navigate to Operators -> Installed Operators -> Kube Descheduler Operator -> Kube Descheduler, then select the cluster instance. Select the YAML tab and add the highlighted line below and then click Save:
apiVersion: operator.openshift.io/v1
kind: KubeDescheduler
metadata:
  name: cluster
  namespace: openshift-kube-descheduler-operator
spec:
  logLevel: Normal
  mode: Automatic
  operatorLogLevel: Normal
  deschedulingIntervalSeconds: 3600
  profileCustomizations:
    devEnableEvictionsInBackground: true
    devLowNodeUtilizationThresholds: high
  profiles:
    - LongLifecycle
The operator will pick up the change in configuration and re-deploy the descheduler pod, using the new thresholds.
Tuning the thresholds - CLI
You can also make this change from the CLI, using the following command oc patch kubedescheduler/cluster -n openshift-kube-descheduler-operator -p '{"spec":{"profileCustomizations":{"devLowNodeUtilizationThresholds":"High"}}}' --type merge
Testing out the DeScheduler with our changed settings
With the changes made to our DeScheduler, lets take a look at the log output
[1 nodeutilization.go:201] "Node is overutilized" node="acm-775pj-worker-ktffc" usage={"cpu":"4433m","memory":"23582425664","pods":"93"} usagePercentage={"cpu":59.10666666666667,"memory":72.60839393304055,"pods":37.2}
[1 nodeutilization.go:201] "Node is overutilized" node="acm-775pj-worker-zzbff" usage={"cpu":"2640m","memory":"7770Mi","pods":"58"} usagePercentage={"cpu":48,"memory":52.250209027629474,"pods":23.2}
[1 nodeutilization.go:198] "Node is underutilized" node="acm-775pj-worker-h525x" usage={"cpu":"904m","memory":"3805Mi","pods":"24"} usagePercentage={"cpu":16.436363636363637,"memory":12.2842038743013,"pods":9.6}
[1 nodeutilization.go:201] "Node is overutilized" node="acm-775pj-master-0" usage={"cpu":"3177m","memory":"10391Mi","pods":"69"} usagePercentage={"cpu":57.763636363636365,"memory":45.353180259939364,"pods":27.6}
[1 nodeutilization.go:201] "Node is overutilized" node="acm-775pj-worker-kjmtr" usage={"cpu":"2977m","memory":"20611041024","pods":"66"} usagePercentage={"cpu":54.127272727272725,"memory":63.45885903145645,"pods":26.4}
[1 nodeutilization.go:201] "Node is overutilized" node="acm-775pj-master-1" usage={"cpu":"3344m","memory":"10555Mi","pods":"69"} usagePercentage={"cpu":60.8,"memory":46.068984471529205,"pods":27.6}
[1 nodeutilization.go:201] "Node is overutilized" node="acm-775pj-master-2" usage={"cpu":"2825m","memory":"8281Mi","pods":"51"} usagePercentage={"cpu":51.36363636363637,"memory":36.14376035008676,"pods":20.4}
[1 nodeutilization.go:201] "Node is overutilized" node="acm-775pj-worker-l5hmt" usage={"cpu":"3133m","memory":"22283288578","pods":"79"} usagePercentage={"cpu":41.77333333333333,"memory":68.60845522201524,"pods":31.6}
[1 nodeutilization.go:201] "Node is overutilized" node="acm-775pj-worker-ph2f8" usage={"cpu":"2364m","memory":"9855Mi","pods":"48"} usagePercentage={"cpu":42.981818181818184,"memory":66.27101801380803,"pods":19.2}
[1 lownodeutilization.go:134] "Criteria for a node under utilization" CPU=40 Mem=40 Pods=40
[1 lownodeutilization.go:135] "Number of underutilized nodes" totalNumber=1
[1 lownodeutilization.go:148] "Criteria for a node above target utilization" CPU=70 Mem=70 Pods=70
[1 lownodeutilization.go:149] "Number of overutilized nodes" totalNumber=8
[1 nodeutilization.go:254] "Total capacity to be moved" CPU=1846 Mem=12249851904 Pods=101
We can now see that the Kube Descheduler has identified one node that is “Under utilized”, and we are now configured so that an “Underutilized” node is anything under 40% utilization, and an OverUtilized node is now anything over 70%.
Now lets see how the Descheduler handles this in moving VMs off the overutilized nodes and onto an underutilized node.
[1 nodeutilization.go:201] "Node is overutilized" node="acm-775pj-worker-ktffc" usage={"cpu":"4433m","memory":"23582425664","pods":"93"} usagePercentage={"cpu":59.10666666666667,"memory":72.60839393304055,"pods":37.2}
[1 nodeutilization.go:201] "Node is overutilized" node="acm-775pj-worker-zzbff" usage={"cpu":"2640m","memory":"7770Mi","pods":"58"} usagePercentage={"cpu":48,"memory":52.250209027629474,"pods":23.2}
[1 nodeutilization.go:198] "Node is underutilized" node="acm-775pj-worker-h525x" usage={"cpu":"904m","memory":"3805Mi","pods":"24"} usagePercentage={"cpu":16.436363636363637,"memory":12.2842038743013,"pods":9.6}
[1 nodeutilization.go:201] "Node is appropriately utilized" node="acm-775pj-master-0" usage={"cpu":"3177m","memory":"10391Mi","pods":"69"} usagePercentage={"cpu":57.763636363636365,"memory":45.353180259939364,"pods":27.6}
[1 nodeutilization.go:201] "Node is appropriately utilized" node="acm-775pj-worker-kjmtr" usage={"cpu":"2977m","memory":"20611041024","pods":"66"} usagePercentage={"cpu":54.127272727272725,"memory":63.45885903145645,"pods":26.4}
[1 nodeutilization.go:201] "Node is appropriately utilized" node="acm-775pj-master-1" usage={"cpu":"3344m","memory":"10555Mi","pods":"69"} usagePercentage={"cpu":60.8,"memory":46.068984471529205,"pods":27.6}
[1 nodeutilization.go:201] "Node is appropriately utilized" node="acm-775pj-master-2" usage={"cpu":"2825m","memory":"8281Mi","pods":"51"} usagePercentage={"cpu":51.36363636363637,"memory":36.14376035008676,"pods":20.4}
[1 nodeutilization.go:201] "Node is appropriately utilized" node="acm-775pj-worker-l5hmt" usage={"cpu":"3133m","memory":"22283288578","pods":"79"} usagePercentage={"cpu":41.77333333333333,"memory":68.60845522201524,"pods":31.6}
[1 nodeutilization.go:201] "Node is appropriately utilized" node="acm-775pj-worker-ph2f8" usage={"cpu":"2364m","memory":"9855Mi","pods":"48"} usagePercentage={"cpu":42.981818181818184,"memory":66.27101801380803,"pods":19.2}
[1 lownodeutilization.go:134] "Criteria for a node under utilization" CPU=40 Mem=40 Pods=40
[1 lownodeutilization.go:135] "Number of underutilized nodes" totalNumber=1
[1 lownodeutilization.go:148] "Criteria for a node above target utilization" CPU=70 Mem=70 Pods=70
[1 lownodeutilization.go:149] "Number of overutilized nodes" totalNumber=2
[1 nodeutilization.go:254] "Total capacity to be moved" CPU=1846 Mem=12249851904 Pods=101
[1 nodeutilization.go:260] "Pods on node" node="acm-775pj-worker-ktffc" allPods=93 nonRemovablePods=56 removablePods=1
[1 nodeutilization.go:267] "Evicting pods based on priority, if they have same priority, they'll be evicted based on QoS tiers"
[1 evictions.go:171] "Evicted pod" pod="descheduler-test/virt-launcher-drs-test1-vm-869wt" reason="" strategy="LowNodeUtilization" node="acm-775pj-worker-ktffc"
[1 nodeutilization.go:260] "Pods on node" node="acm-775pj-worker-l5hmt" allPods=79 nonRemovablePods=50 removablePods=1
[1 nodeutilization.go:267] "Evicting pods based on priority, if they have same priority, they'll be evicted based on QoS tiers"
[1 evictions.go:171] "Evicted pod" pod="myvms/virt-launcher-fedora-tomato-meerkat-45-8htp8" reason="" strategy="LowNodeUtilization" node="acm-775pj-worker-l5hmt"
[1 nodeutilization.go:260] "Pods on node" node="acm-775pj-worker-kjmtr" allPods=66 nonRemovablePods=50 removablePods=0
[1 nodeutilization.go:263] "No removable pods on node, try next node" node="acm-775pj-master-1"
<lines excluded>
[1 profile.go:356] "Total number of pods evicted" extension point="Balance" evictedPods=2
[1 descheduler.go:170] "Number of evicted pods" totalEvicted=2
So in reviewing the output above, we can see that the Descheduler was able to identify an underutilized node, as well as multiple overutilized nodes, and identified VMs to be evicted. We can check the pods that were evicted above and see that they are running on the underutilized node:
$ oc get po -n myvms -o wide
NAME                                           READY   STATUS    RESTARTS   AGE   IP            NODE                     NOMINATED NODE   READINESS GATES
virt-launcher-fedora-tomato-meerkat-45-8htp8   2/2     Running   0          16m   10.128.4.96   acm-775pj-worker-h525x   <none>           1/1
$ oc get po -n descheduler-test -o wide
NAME                               READY   STATUS    RESTARTS   AGE   IP            NODE                     NOMINATED NODE   READINESS GATES
virt-launcher-drs-test1-vm-869wt   3/3     Running   0          20m   10.128.4.95   acm-775pj-worker-h525x   <none>           1/1
SUCCESS As you can see the two vm pods have been moved to the underutilized node, balancing out the workload on the overall cluster. The Descheduler has balanced out the requested workload across all the nodes in the cluster to the best of its ability.
Whats next
In this post we discussed what is possible now with the Kubernetes Descheduler and managing resource utilization of OpenShift Virtualization VMS. The big lesson learned here is that the descheduler is only looking at K8s node reservations and limits … But what if it could do more. That is the question that Red Hat engineers asked themselves at the end of the year in 2024, and a solution is on the way. Node Aware Rebalancing is the latest work being done in this area, and will become GA in future Red Hat release. Watch this blog for future work enabling this great new feature.
References
Enabling Descheduler Evictions for Virtualization
Cluster Kube Descheduler Operator