Installing Tanzu Community Edition on vSphere
Over the past year, I have heard much about VMware Tanzu, but have yet to experience what it is or how it works. Given my infrastructure background, I am interested in how it installs, and how does one maintain it long term. So with those questions in mind, I decided to try installing Tanzu Community Edition.
What is Tanzu? Tanzu is VMware’s productized version of Kubernetes, designed to run on AWS, Azure, and vSphere. There are multiple editions available including Basic, Standard, Advanced and Community. VMware provides a comparison between the different versions and what features they offer here: Compare VMware Tanzu Editions This blog post will focus on deploying the Community Edition on vSphere. The Community Edition is different from the commercial offerings, the cluster deployment, and management process is different when using the commercial offering.
When Installing Tanzu, you have the choice of two operating systems as supplied by VMWare. The first option is Photon, which is VMware’s Linux OS distribution. The other option is an image based on Ubuntu 20.04. As of the time of this blog, VMware gives three versions of Kubernetes from which you can choose: 1.19.12, 1.20.8, and 1.21.2. It is also possible to create your own base image using the image-builder project to create a new OS image. OS images are a union of the OS version and Kubernetes version. So for example you would have one image for Ubuntu 20.04 with Kubernetes 1.19.1 and another image for Ubuntu 20.04 and Kubernetes 1.20.2. Each image must be maintained separately.
The steps and information in the remainder of this blog were pulled from multiple sources including the following articles:
Prerequisites
You will need to have the following to test out Tanzu CE in vSphere:
- vSphere 6.7 or higher
- The Tanzu CE Installer: Follow the instructions from the cli-installation documentation
- kubectl binary which can be found here: https://kubernetes.io/docs/tasks/tools/
- A workstation with Docker installed. This can be a Windows machine, a Mac, or a Linux Workstation
NOTE: Tanzu installer does not support Podman or CGROUPS v2. If your existing work processes involve the use of current container tools such as podman and/or cgroups v2 you will need to deploy a separate machine that does not use these tools and instead uses Docker
- A network on which you will deploy your clusters that has DHCP enabled
Stand-alone vs Managed Clusters
Tanzu has the concept of Managed and Standalone clusters. Managed clusters are created (and managed) by a master Kubernetes cluster that must be deployed first. This master cluster is then used to bootstrap and deploy any future “workload” clusters that are designed for end-user application deployments.
You can also deploy clusters in Standalone mode. Standalone mode appears to be more for testing purposes, or when you need to deploy clusters with fewer resources than managed clusters would require. You can not deploy upgrades to Standalone clusters and as of the current release you can not scale Standalone clusters after they are deployed. This blog post will focus on deploying a Management Cluster and additional workload clusters since this is the more Production like process.
Deploying a Management Cluster
The start of our Tanzu journey will be with deploying a Management cluster. Ensure that you have installed the tanzu binaries as listed in the Prerequisites and then run the command tanzu management-cluster create --ui
$ tanzu management-cluster create --ui

Validating the pre-requisites...
Serving kickstart UI at http://127.0.0.1:8080
At this point, a new web browser instance should start up and connect to the UI listed in the output. You are greeted with a screen welcoming you to the Tanzu CE Installer. You have the option of installing in Docker, vSphere, AWS, and Azure.
Since we will be using vSphere as the infrastructure provider for the remainder of this blog, we will select the DEPLOY button in the “VMware vSphere” section to continue.
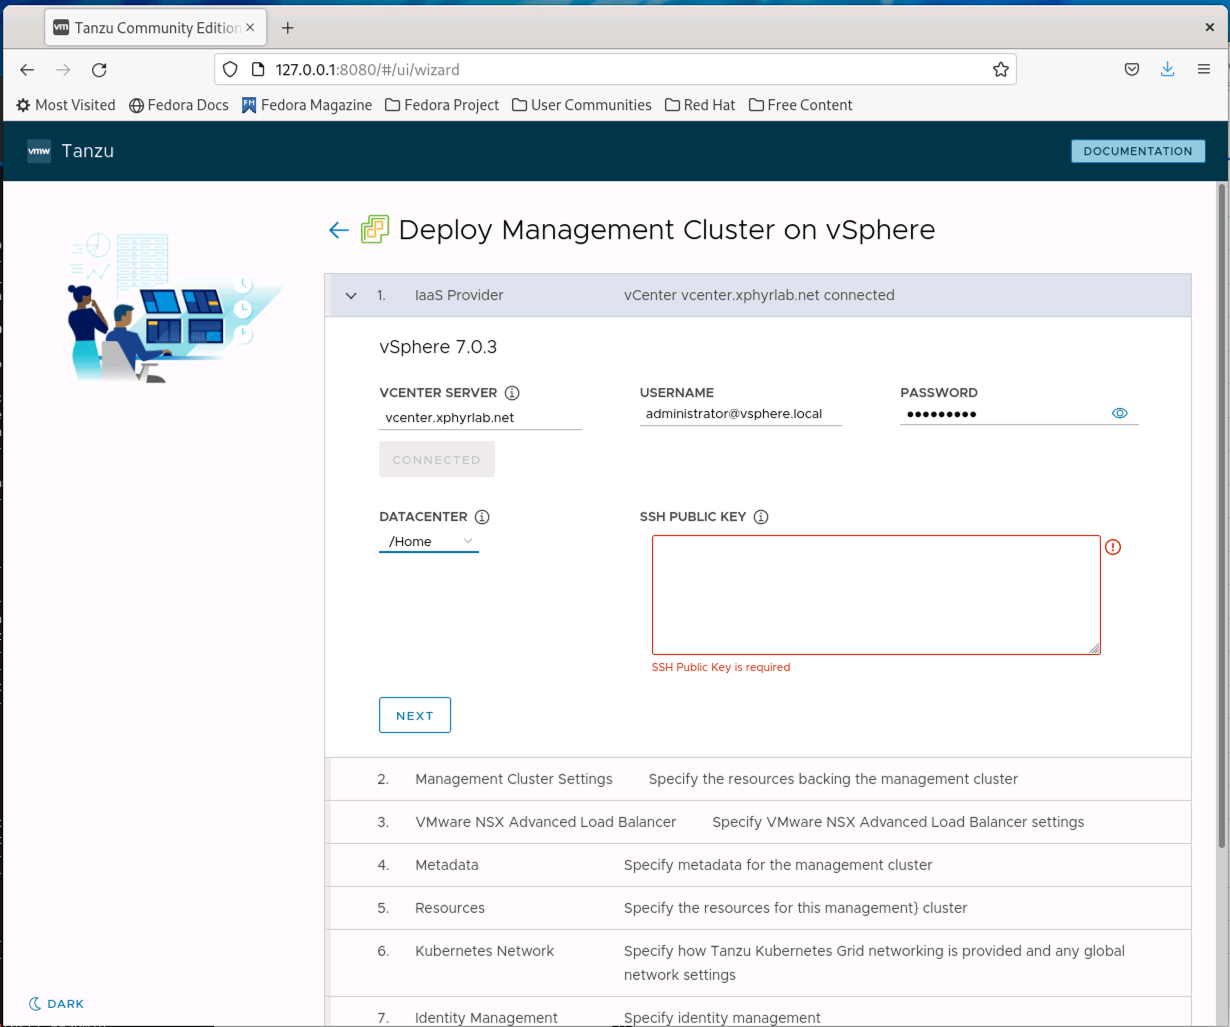
You will need to provide connection information for your vSPhere cluster and supply an ssh key that will be used for remote access to the nodes that are deployed if required. Once this information is entered, you can click NEXT
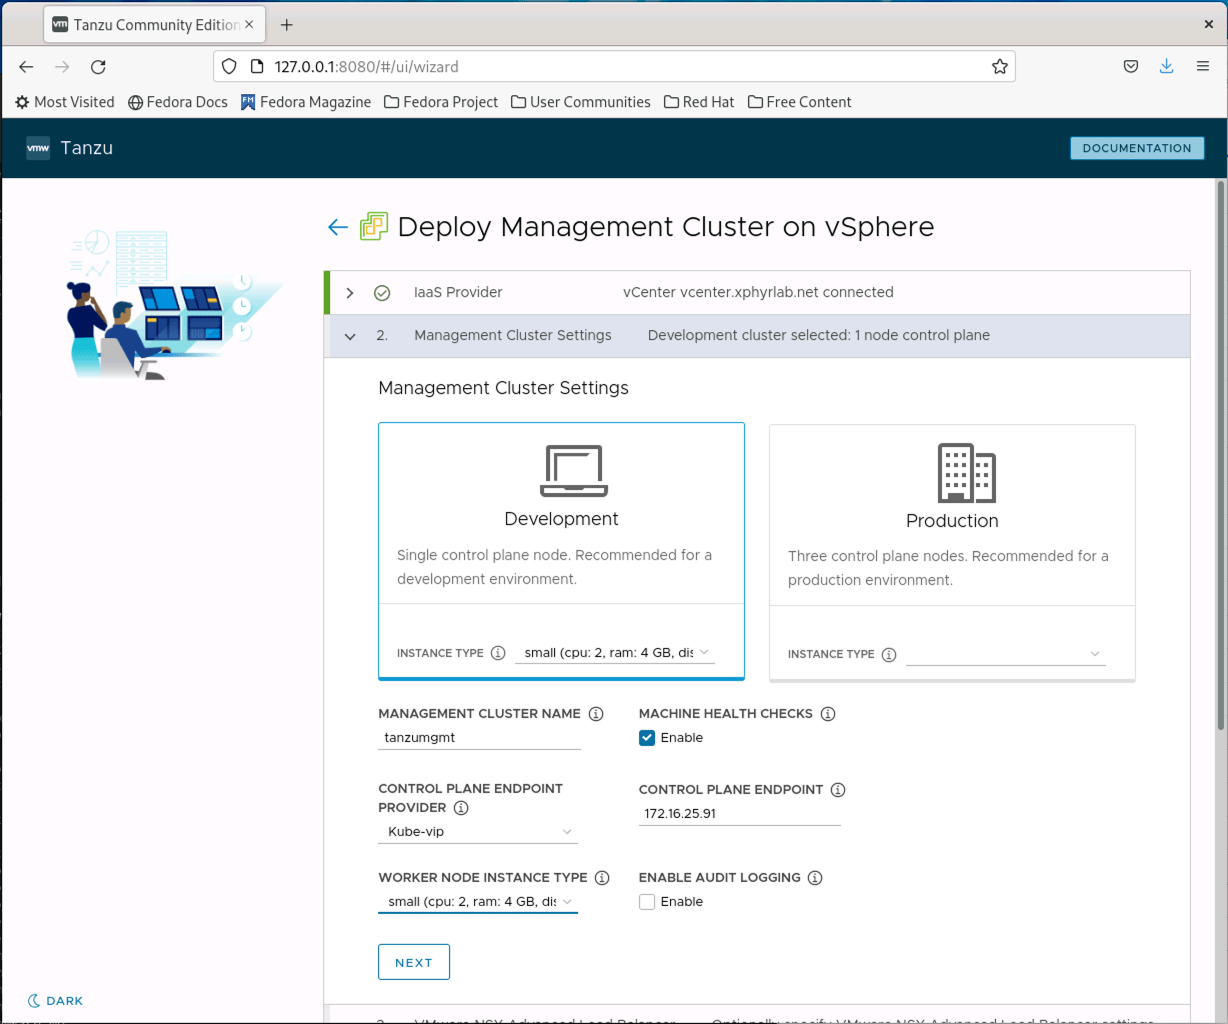
You can now select the type of Management cluster you want to deploy Development or Production. Development clusters use only one control plane node, which minimizes the number of resources you use for the cluster but also does not supply high availability or redundancy in your management cluster. The Production option will deploy a larger cluster with the typical three-node control plane as well as multiple worker nodes. You will need to supply an IP address for the Control Plane to use. This will be the IP address of your management cluster. You have the option to use VMware NSX for networking, or can use Kube-vip which will work with standard vSphere networking. Click NEXT to continue.
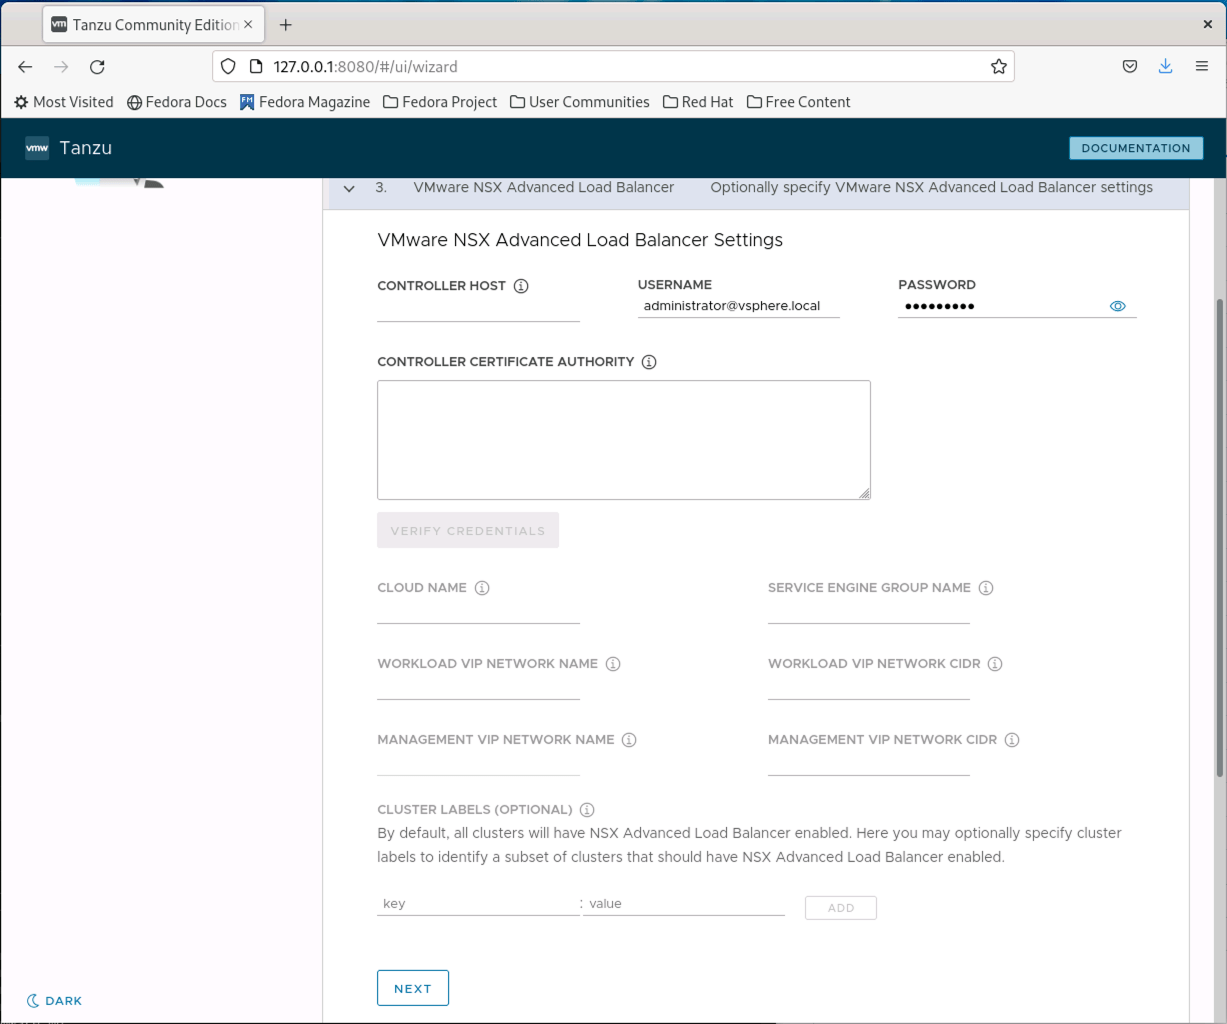
If you choose to use VMware NSX integration you will need to configure it here. We will not be using NSX as a part of this post. Click NEXT to continue.
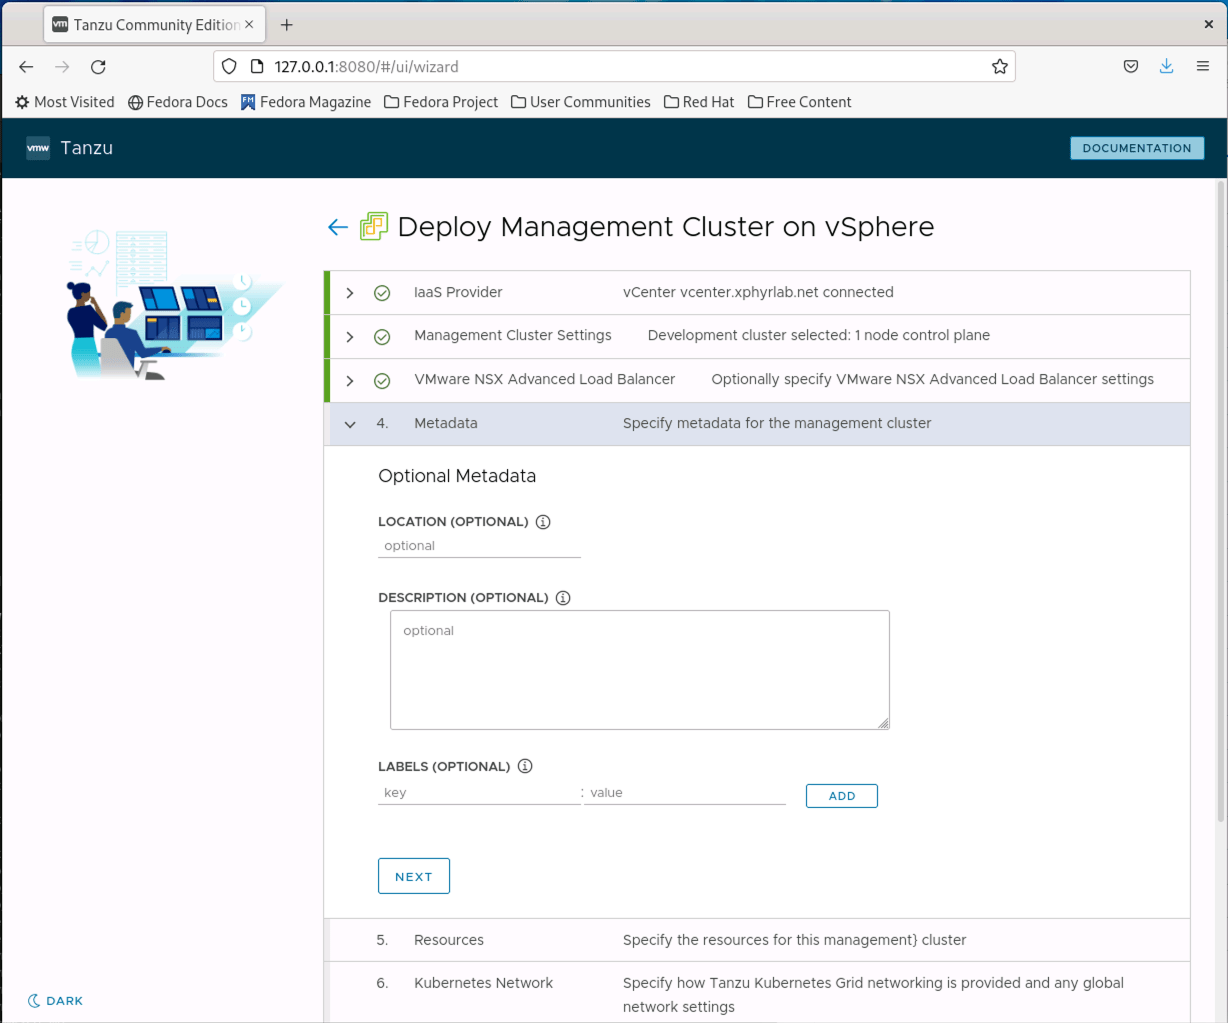
You can add metadata to your cluster on this screen. Click NEXT to continue.
At this point, you need to select a VM Folder, Datastore, and resource pool to deploy the new Management cluster into. You can not create a VM Folder, as part of this process, so you should pre-create a VM Folder before starting the install. You also can not select a Datastore Cluster and must select an individual Datastore to deploy to. Click NEXT to continue.
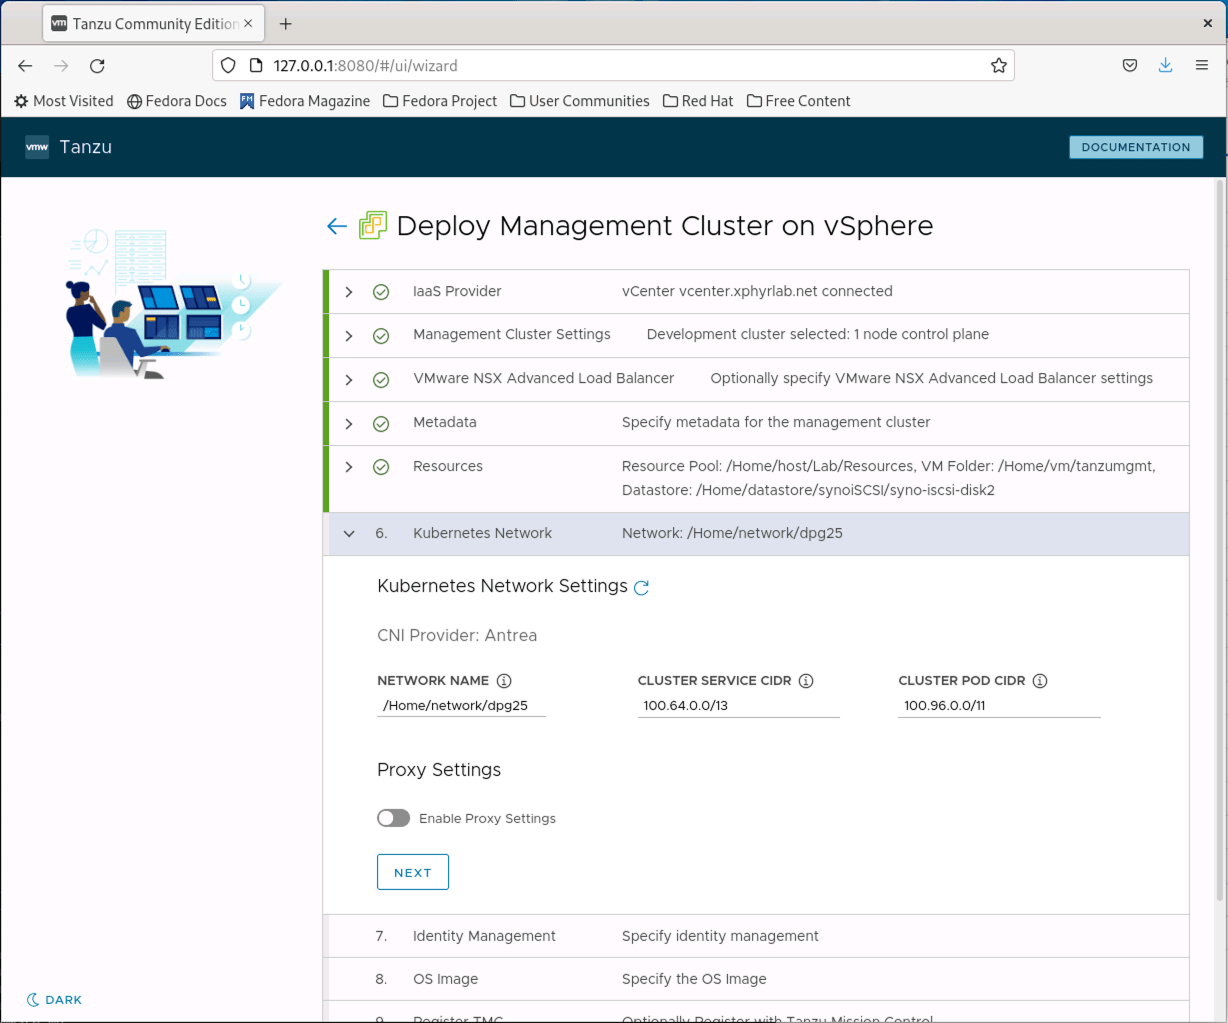
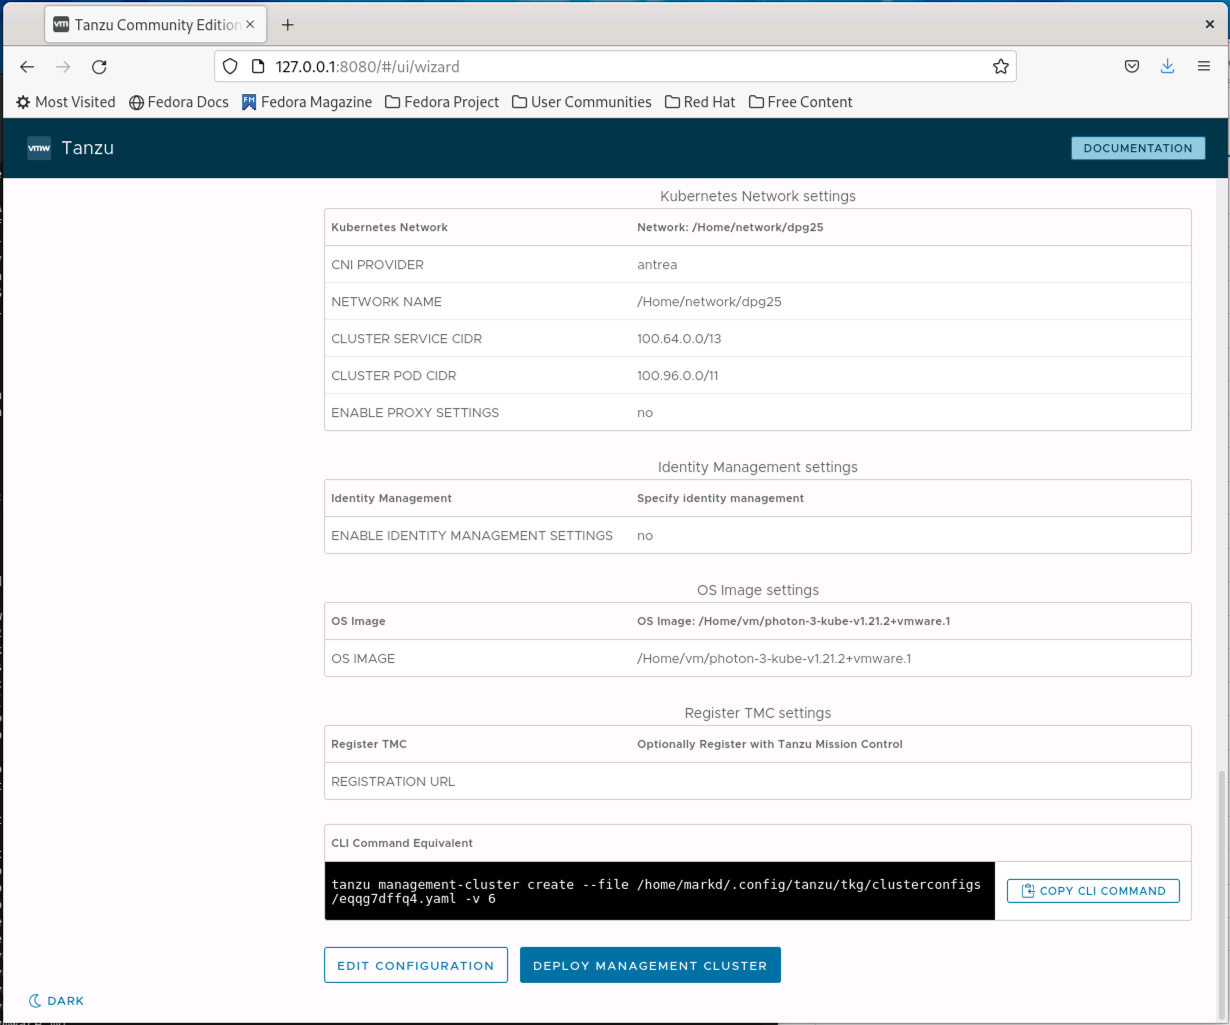
You now need to select the network that the machines will be attached to and validate the Cluster Service CIDR and Cluster POD CIDR. You should ensure that the network you select is the same network that the cluster IP address you set earlier in the process is on. Click NEXT to continue.
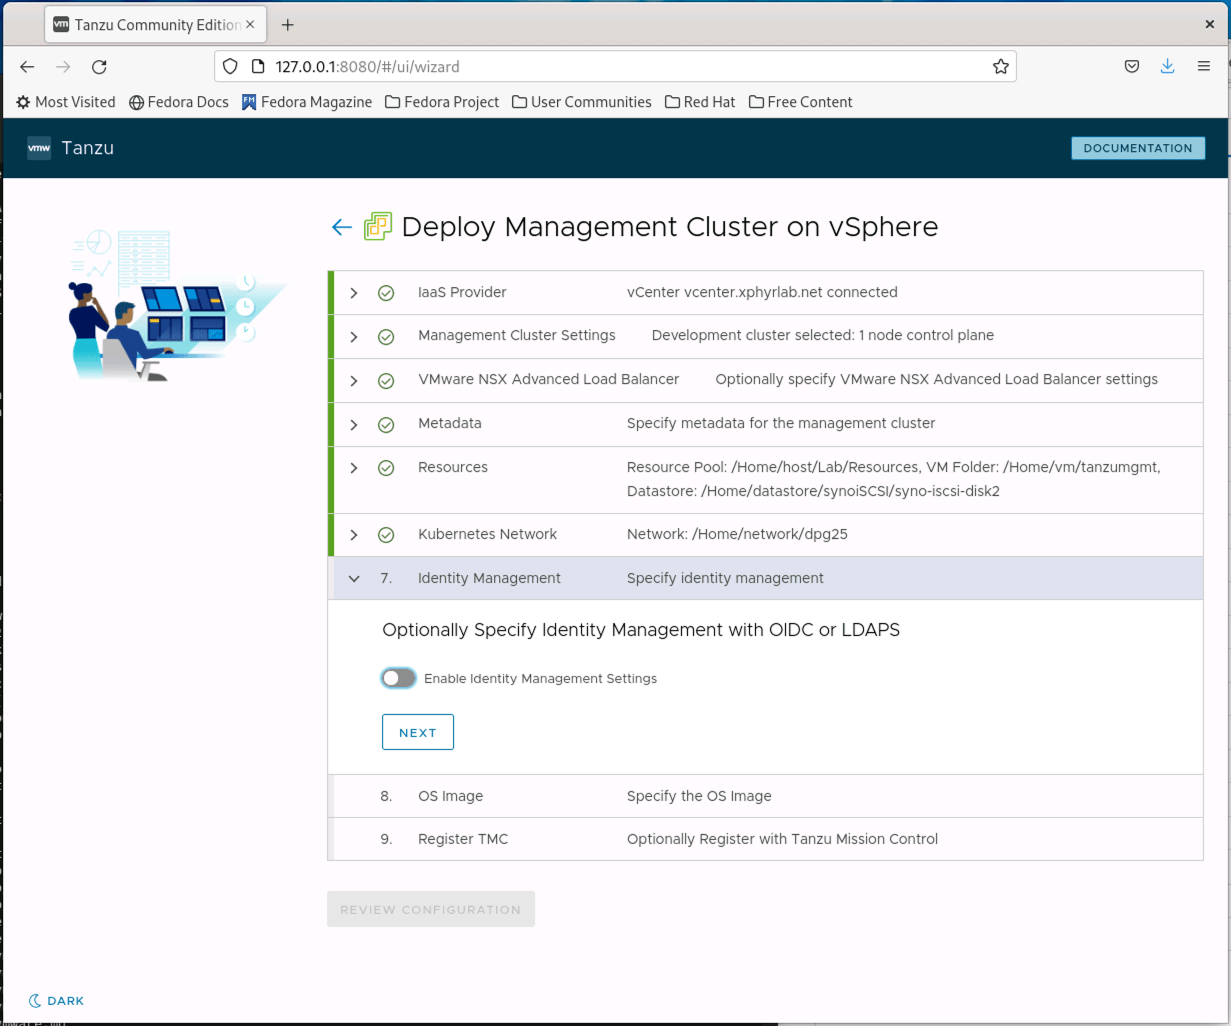
You can configure your management cluster to use LDAP or OIDC authentication as part of the deployment if you need this. Click NEXT to continue.
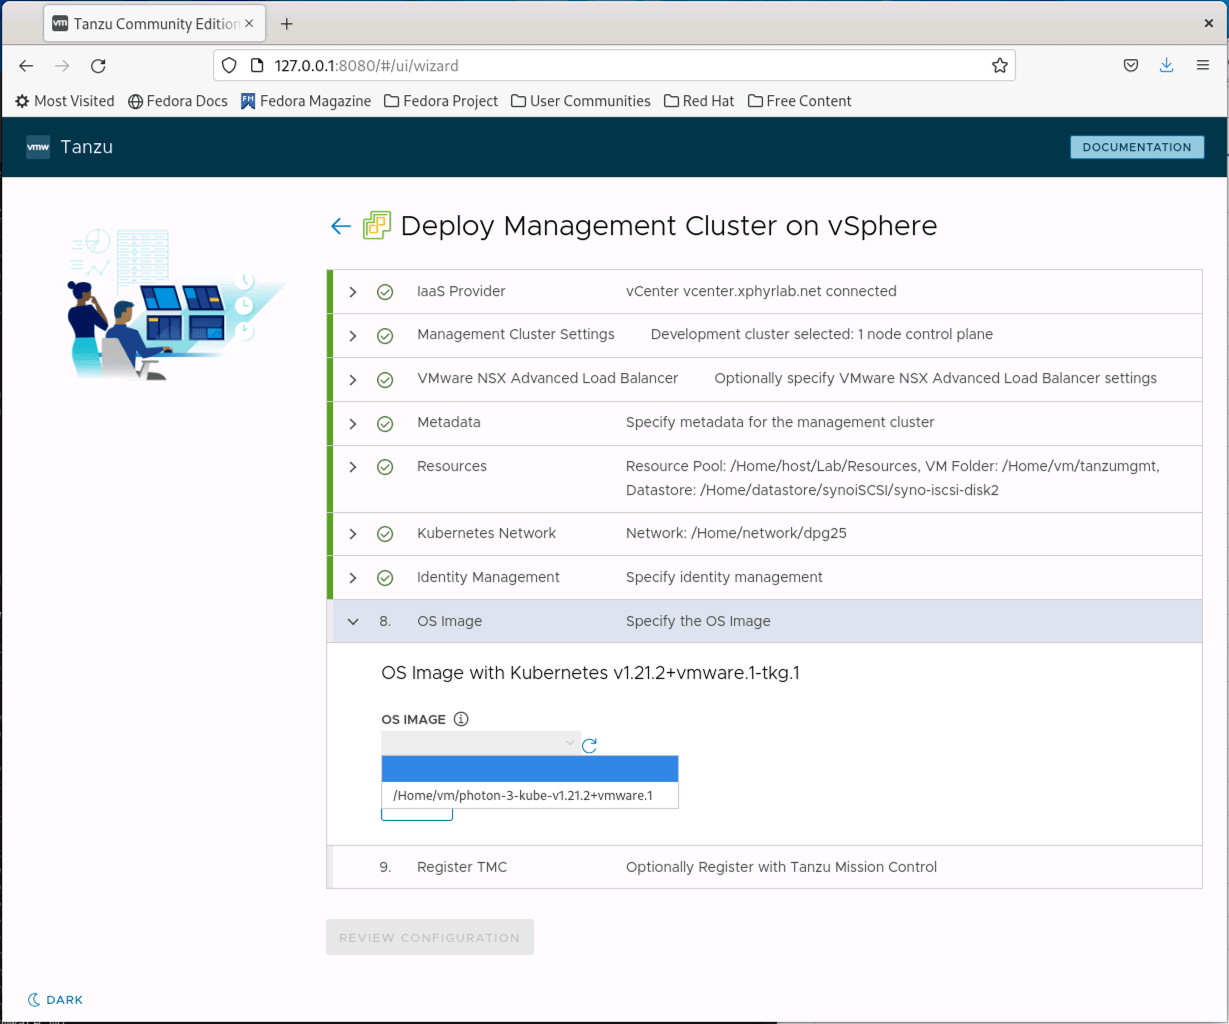
Tanzu uses pre-made OS images to deploy the cluster. When deploying on VMware, you will need to download the appropriate base image from VMware, and upload it to your vSphere cluster and convert it to a template. Once you have done this, you can select the OS Image on this screen. Click NEXT to continue.
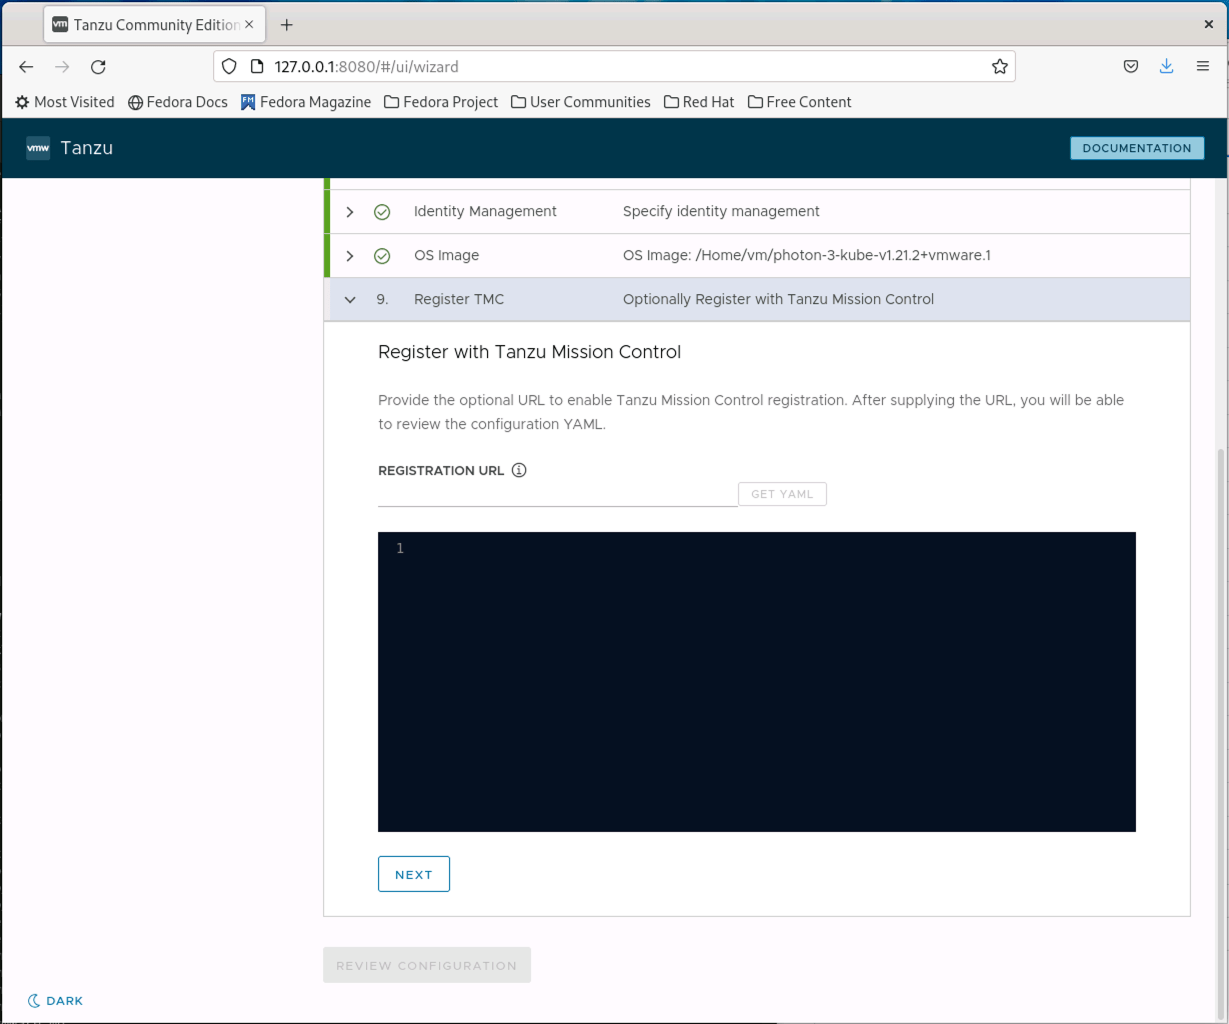
Finally, you are given an option to register this cluster with Tanzu Mission Control which is a Kubernetes management platform. Tanzu Mission Control does not appear to have a freely available version to use, so we will leave this blank and click NEXT to continue.
At this point, you are shown a summary of all the options that you selected. Validate that everything is correct, and then select DEPLOY MANAGEMENT CLUSTER. At this point, the installer will deploy a new management cluster. When it completes the installer will exit, and you will be left with the UI screen in your browser window, but it is now orphaned since the installer has quit.
Deploying a Workload Cluster
With our management cluster deployed, we can now create workload clusters. The creation of workload clusters is not done through a UI but is instead done by creating/editing a cluster definition file. We will use the management cluster configuration file as a template to create our new workload cluster.
Start by making a copy of the configuration file that defines our Management Cluster, we will use this as a template to work from in our next step.
$ ls ~/.config/tanzu/tkg/clusterconfigs/
ao55cfb61n.yaml  eqqg7dffq4.yaml  workload1.yml
$ cp  ~/.config/tanzu/tkg/clusterconfigs/<MGMT-CONFIG-FILE> ~/.config/tanzu/tkg/clusterconfigs/workload1.yaml
Now open the file you just created in an editor and update the following sections of the file.
At a minimum be sure to update the CLUSTER_NAME and VSPHERE_CONTROL_PLANE_ENDPOINT, or you will get an error about a duplicate cluster.
CLUSTER_NAME: my-workload-cluster
CLUSTER_PLAN: dev
VSPHERE_CONTROL_PLANE_ENDPOINT: 172.16.25.91
VSPHERE_DATASTORE: /Home/datastore/synoiSCSI/syno-iscsi-disk2
VSPHERE_FOLDER: /Home/vm/tanzumgmt
By default, the tanzu command will deploy the latest version of Kubernetes, however, if you want to deploy a different version there are options. We can see the list of supported releases by running the following command:
$ tanzu kubernetes-release get
 NAME                       VERSION                  COMPATIBLE  ACTIVE  UPDATES AVAILABLE
 v1.19.12---vmware.1-tkg.1  v1.19.12+vmware.1-tkg.1  True        True    True
 v1.21.2---vmware.1-tkg.1   v1.21.2+vmware.1-tkg.1   True        True    False
Later on in this post, we will try to upgrade the cluster, so let’s create a new cluster based on Kubernetes 1.19. We specify the target Kubernetes version with the –tkr option as seen below:
$ tanzu cluster create tanzutest1 --tkr v1.19.12---vmware.1-tkg.1 --file ~/.config/tanzu/tkg/clusterconfigs/workload1.yml
Validating configuration...
Warning: Pinniped configuration not found. Skipping pinniped configuration in workload cluster. Please refer to the documentation to check if you can configure pinniped on workload cluster manually
Creating workload cluster 'tanzutest1'...
Waiting for cluster to be initialized...
Waiting for cluster nodes to be available...
Waiting for addons installation...
Waiting for packages to be up and running...

Workload cluster 'tanzutest1' created
Connecting to your Cluster(s)
Once your workload cluster is deployed you will need to get your cluster credentials. This is done using the tanzu command cluster kubeconfig get. We will use the tanzu cluster list command to get a list of the clusters available and then retrieve the credentials from our newly created cluster:
$ tanzu cluster list
 NAME        NAMESPACE  STATUS   CONTROLPLANE  WORKERS  KUBERNETES         ROLES   PLAN
 tanzutest1  default    running  1/1           1/1      v1.19.12+vmware.1  <none>  dev
$ tanzu cluster kubeconfig get <WORKLOAD-CLUSTER-NAME> --admin
Credentials of cluster 'tanzutest1' have been saved
You can now access the cluster by running 'kubectl config use-context tanzutest1-admin@tanzutest1'
The credentials are saved as a Kubernetes context as part of your local kubeconfig file. This allows you to manage multiple clusters from your machine. For more information on Kubernetes contexts and managing multiple clusters see Configure Access to Multiple Clusters. For now, you can see a list of all the contexts you have by running:
$ kubectl config get-contexts
CURRENT   NAME                          CLUSTER      AUTHINFO           NAMESPACE
         tanzumgmt-admin@tanzumgmt     tanzumgmt    tanzumgmt-admin
         tanzutest1-admin@tanzutest1   tanzutest1   tanzutest1-admin
We will set a default context using the following command:
$ kubectl config use-context tanzutest1-admin@tanzutest1
Switched to context "tanzutest1-admin@tanzutest1".
Scaling the workload cluster
It is possible to scale your workload cluster by adding more worker nodes to the cluster. We will use the tanzu command to scale our cluster up.
NOTE: As of the current release scaling a cluster is only supported for Managed clusters. Standalone clusters can not be scaled.
The command shown below will scale up the tanzutest1 cluster we created to have 3 worker nodes. The same command can be used to scale down the cluster as well, by specifying a worker-machine-count that is less than the currently deployed number of nodes.
$ tanzu cluster list
 NAME        NAMESPACE  STATUS   CONTROLPLANE  WORKERS  KUBERNETES         ROLES   PLAN
 tanzutest1  default    running  1/1           1/1      v1.19.12+vmware.1  <none>  dev
$ tanzu cluster scale tanzutest1 --worker-machine-count 3
Successfully updated worker node machine deployment replica count for cluster tanzutest1
Workload cluster 'tanzutest1' is being scaled
The scale-up process will take some time depending on the vSphere cluster you are running on and how much you are expanding the cluster. You can watch the cluster expand and validate that the scaling has been completed with the kubectl get nodes command:
$ kubectl get nodes
NAME                               STATUS   ROLES    AGE    VERSION
tanzutest1-control-plane-74tw6     Ready    master   81m    v1.19.12+vmware.1
tanzutest1-md-0-78dff7994f-272qm   Ready    <none>   95s    v1.19.12+vmware.1
tanzutest1-md-0-78dff7994f-6ltdd   Ready    <none>   76m    v1.19.12+vmware.1
tanzutest1-md-0-78dff7994f-x4vv8   Ready    <none>   102s   v1.19.12+vmware.1
Upgrading your Workload Cluster
Tanzu can handle cluster upgrades as part of its “Day Two” operations. When we deployed our workload cluster we deployed an older version of Kubernetes so that we could test out the upgrade process. In reviewing the documentation we should be able to see a list of versions that a cluster can be upgraded to. However, when running the command the results come back that the tanzutest1 cluster is not compatible with any of the updates. Attempting to force an upgrade also did not work.
$ tanzu cluster available-upgrades get tanzutest1
 NAME                             VERSION                        COMPATIBLE
 v1.20.4---vmware.1-tkg.1         v1.20.4+vmware.1-tkg.1         False
 v1.20.4---vmware.1-tkg.2         v1.20.4+vmware.1-tkg.2         False
 v1.20.4---vmware.3-tkg.1         v1.20.4+vmware.3-tkg.1         False
 v1.20.5---vmware.1-tkg.1         v1.20.5+vmware.1-tkg.1         False
 v1.20.5---vmware.2-fips.1-tkg.1  v1.20.5+vmware.2-fips.1-tkg.1  False
 v1.20.5---vmware.2-tkg.1         v1.20.5+vmware.2-tkg.1         False
 v1.20.8---vmware.1-fips.1-tkg.2  v1.20.8+vmware.1-fips.1-tkg.2  False
 v1.20.8---vmware.1-tkg.2         v1.20.8+vmware.1-tkg.2         False
$ tanzu cluster upgrade  tanzutest1
Upgrading workload cluster 'tanzutest1' to kubernetes version 'v1.21.2+vmware.1'. Are you sure? [y/N]: y
Validating configuration...
Verifying kubernetes version...
Error: kubernetes version verification failed: Upgrading Kubernetes from v1.19.12+vmware.1 to v1.21.2+vmware.1 is not supported
Unfortunately, I was not able to get the upgrade process working. Perhaps when the next release of Tanzu CE comes out I will be able to test the upgrade path.
Cleaning up our Clusters
The tanzu command also allows you to delete clusters that you made using the tanzu command. To clean up and delete our workload cluster as well as our management cluster you can run the following commands:
$ tanzu clusters list --include-management-cluster
 NAME        NAMESPACE   STATUS   CONTROLPLANE  WORKERS  KUBERNETES         ROLES       PLAN
 tanzutest1  default     running  1/1           1/1      v1.19.12+vmware.1  <none>      dev
 tanzumgmt   tkg-system  running  1/1           1/1      v1.21.2+vmware.1   management  dev
$ tanzu cluster delete tanzutest1
Deleting workload cluster 'tanzutest1'. Are you sure? [y/N]: y
Workload cluster 'tanzutest1' is being deleted
At this point, the workload cluster will be cleaned up and deleted from your vSphere cluster. You can validate that the cluster is deleted by listing the clusters again:
$ tanzu clusters list --include-management-cluster
 NAME        NAMESPACE   STATUS   CONTROLPLANE  WORKERS  KUBERNETES         ROLES       PLAN
 tanzumgmt   tkg-system  running  1/1           1/1      v1.21.2+vmware.1   management  dev
Deleting the management cluster follows a similar workflow but uses the management-cluster delete command. The process takes more time as it has to build a local “cleanup cluster” first and then run the cleanup from that cluster:
$ tanzu management-cluster delete tanzumgmt
Deleting management cluster 'tanzumgmt'. Are you sure? [y/N]: y
Verifying management cluster...
cluster specific secret is not present, fallback on bootstrap credential secret
Setting up cleanup cluster...
Installing providers to cleanup cluster...
Fetching providers
Installing cert-manager Version="v1.1.0"
Waiting for cert-manager to be available...
Installing Provider="cluster-api" Version="v0.3.23" TargetNamespace="capi-system"
Installing Provider="bootstrap-kubeadm" Version="v0.3.23" TargetNamespace="capi-kubeadm-bootstrap-system"
Installing Provider="control-plane-kubeadm" Version="v0.3.23" TargetNamespace="capi-kubeadm-control-plane-system"
Installing Provider="infrastructure-vsphere" Version="v0.7.10" TargetNamespace="capv-system"
Moving Cluster API objects from management cluster to cleanup cluster...
Performing move...
Discovering Cluster API objects
Moving Cluster API objects Clusters=1
Creating objects in the target cluster
Deleting objects from the source cluster
Waiting for the Cluster API objects to get ready after move...
Deleting management cluster...
Management cluster 'tanzumgmt' deleted.
Deleting the management cluster context from the kubeconfig file '/home/markd/.kube/config'

Management cluster deleted!
Conclusion
In this blog post we walked through a Tanzu Community Edition install. We also tried out a few “Day Two” operations such as scaling up the cluster size and attempting an upgrade. Tanzu community edition is still relatively new, released back in early October just before Kubecon NA 2021. Introducing VMware Tanzu Community Edition It is clearly built around the same components as the Tanzu commercial offerings with a few things stripped out.
At this point I do not feel that it is quite as complete as some of the other Kubernetes distributions that are available. Other “Community Distributions” such as OKD and Rancher are more polished when it comes to supplying a well-rounded full Kubernetes solution. That is not to say that Tanzu is without merit. If you are looking to deploy a bare-bones cluster with the bare minimum required to run Kubernetes then Tanzu gives an easy way to deploy multiple clusters with minimal effort. It should also be noted that you can layer in additional individual pieces to handle things like logging, ingress, metrics and monitoring through the use of “packages” that are supplied as part of Tanzu CE. More information on package deployment can be found here: Work with Packages.

